
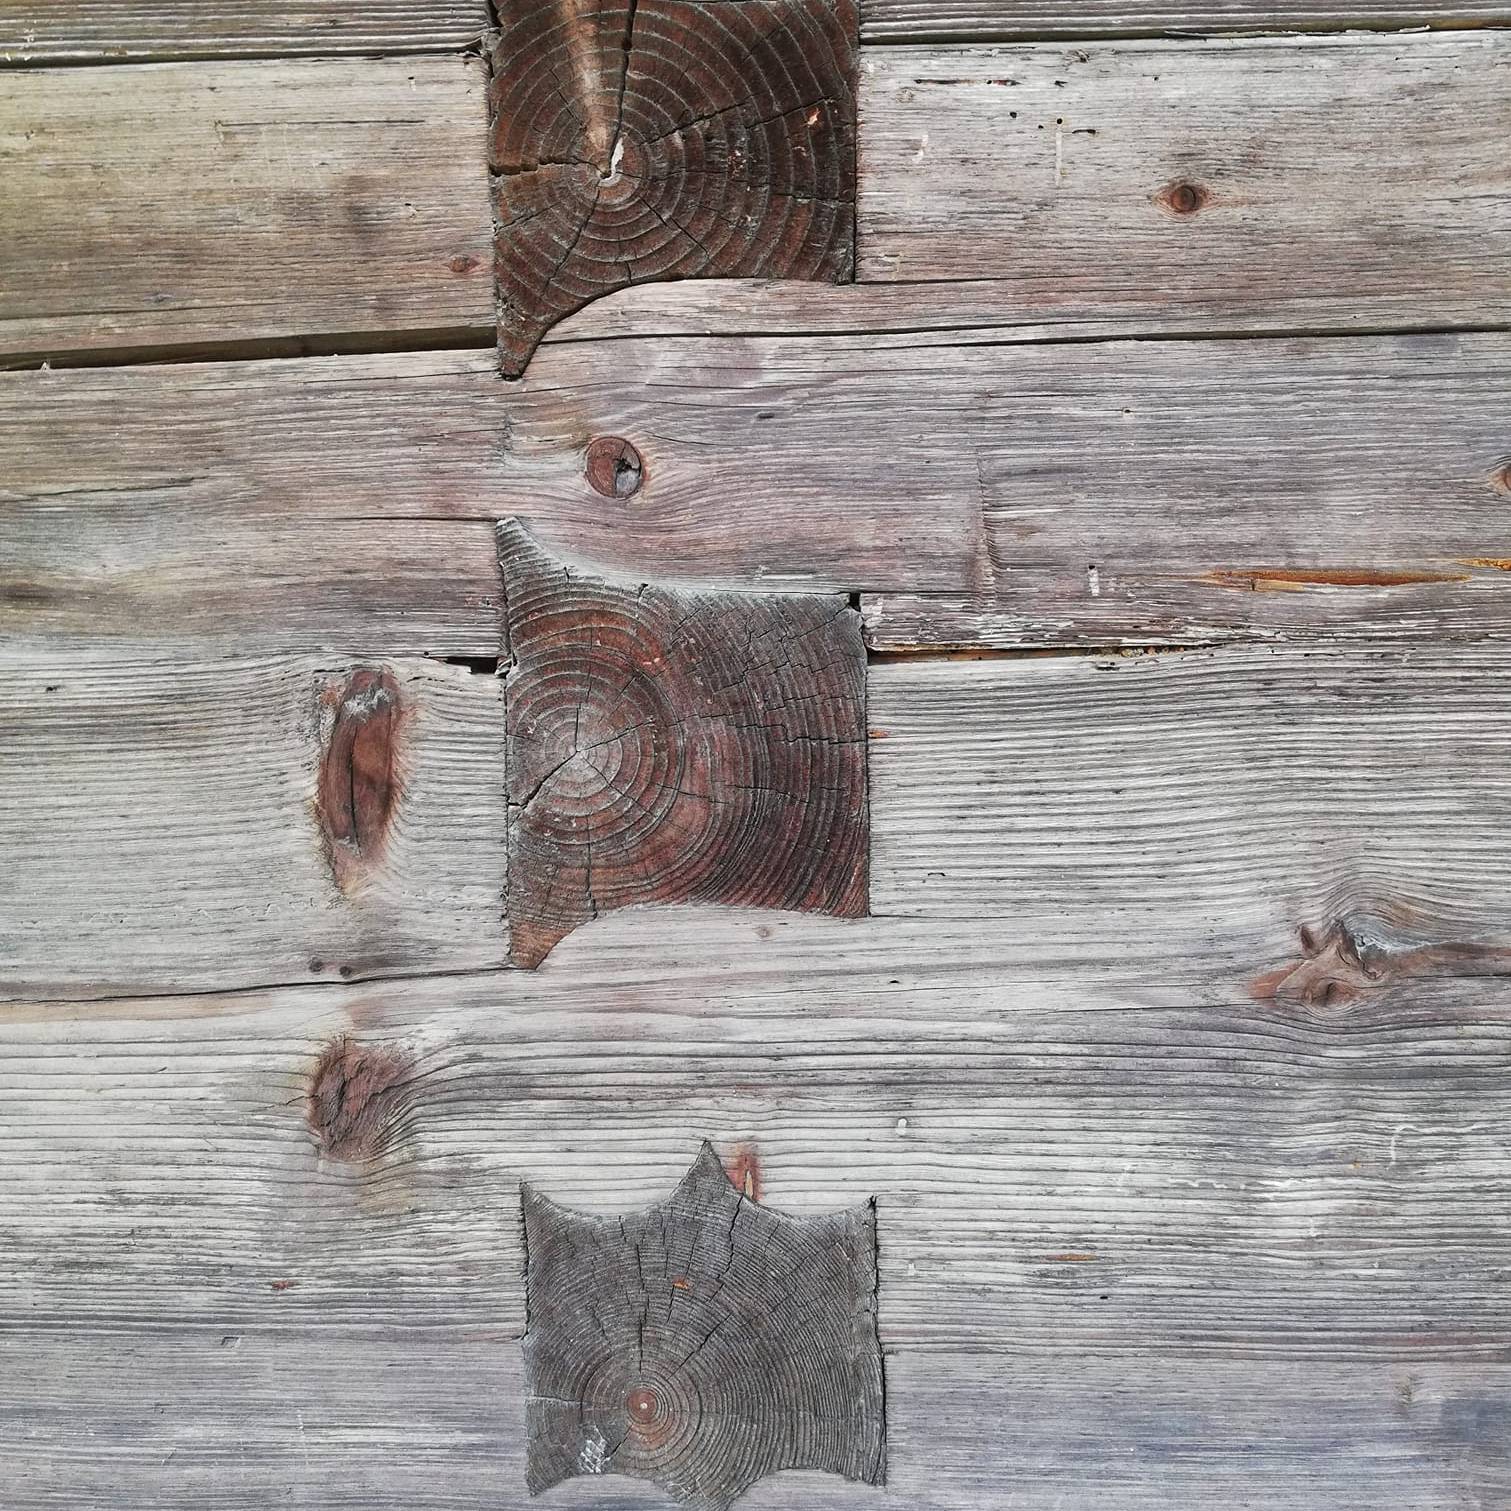
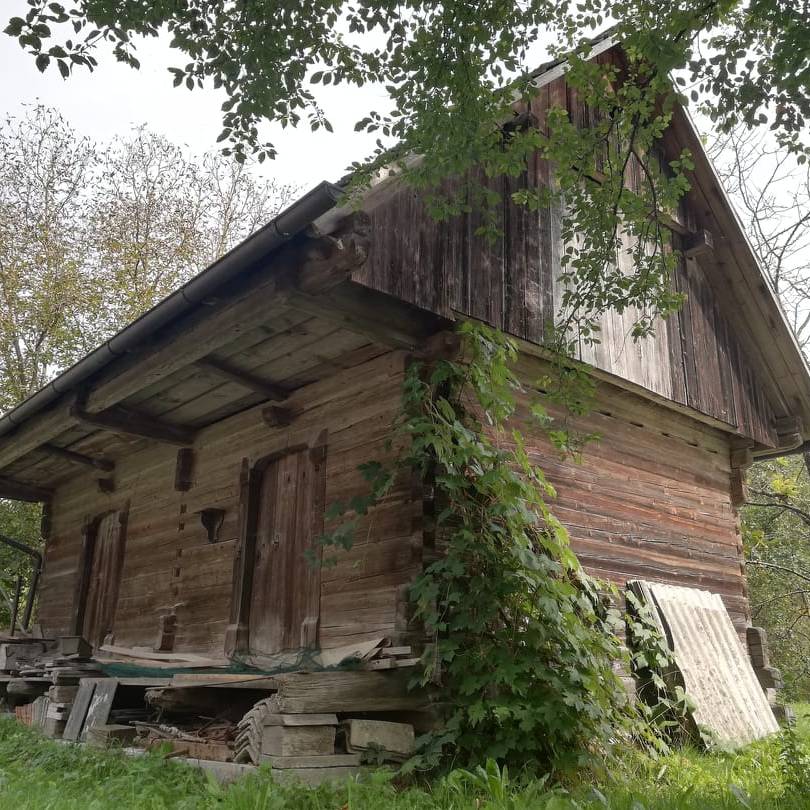
Sometime in the Autumn of 2020, I came across this photo of the detail of a wooden house near Kamnik in the Tuhinj Valley in Slovenia. It had been posted on social media by Jože Kozjek who works as a forester there, and is committed to photograph and document what he sees as remarkable testimonies to the cultural heritage of his region and country.

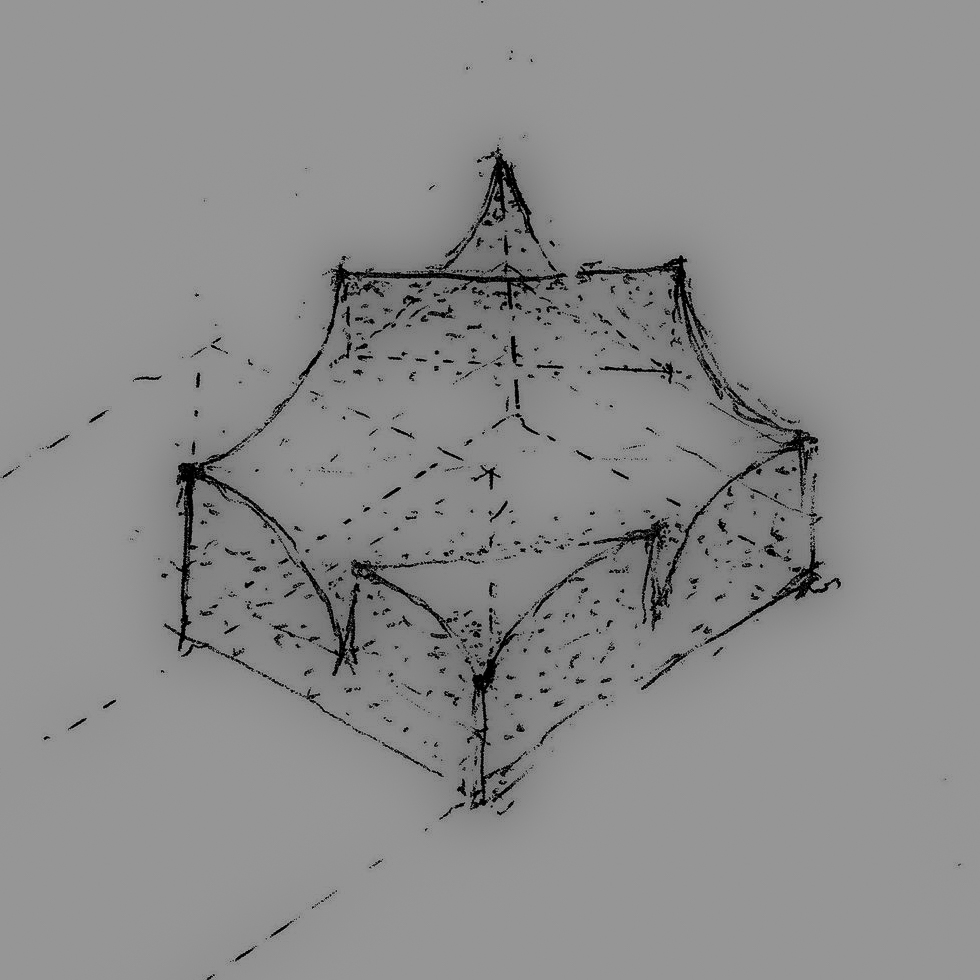
This house and many others related are extraordinary pieces of design, moving tributes to human inventiveness as it is played out within (or around) a traditional form.
These are of course words of ‘now’, written in admiration towards a process which was conducted with such fluency and ease that it could only be derived from embodied shared knowledge. We might now tend to call it ‘tradition’ which is a somewhat deadening word to pin onto something so alive, virtuosic and exuberant.
Being both related and totally foreign to my work on violins, it was fascinating for me to try to figure out how these angled joints might be designed and cut.
The reason for these few words and images is to share this fascination.
Of the houses themselves I know little. They are known to date from the 18th to the 19th centuries. My guess is that as often seen in forest dwellings [still practised today in the ‘carbets’ of the French Guyanian rain forest], a clearing is cut, and the house is built from the timber felled. It seems to be spruce, Picea Abies. It would be interesting to submit some of the ring patterns for dendrochronological study, as it may confirm the age and also the provenance of the timber.
So to these joints: a Baroque variation on a double dovetail? And why such virtuosity?
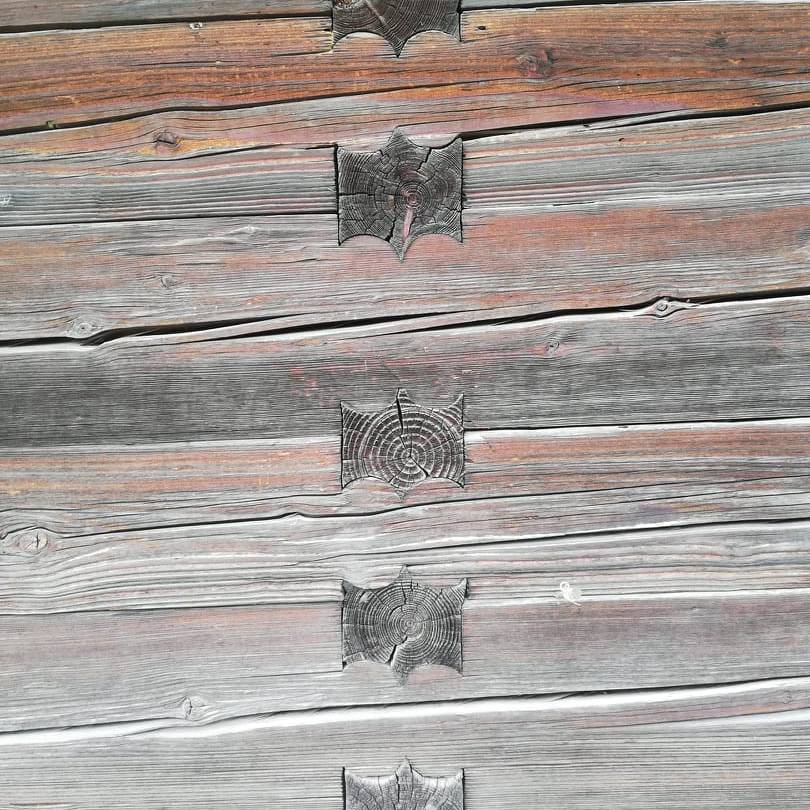
The method for stacking, alternating the beams on either side of the corner is clear if one looks at the photograph above, but the joining method is elusive at first.
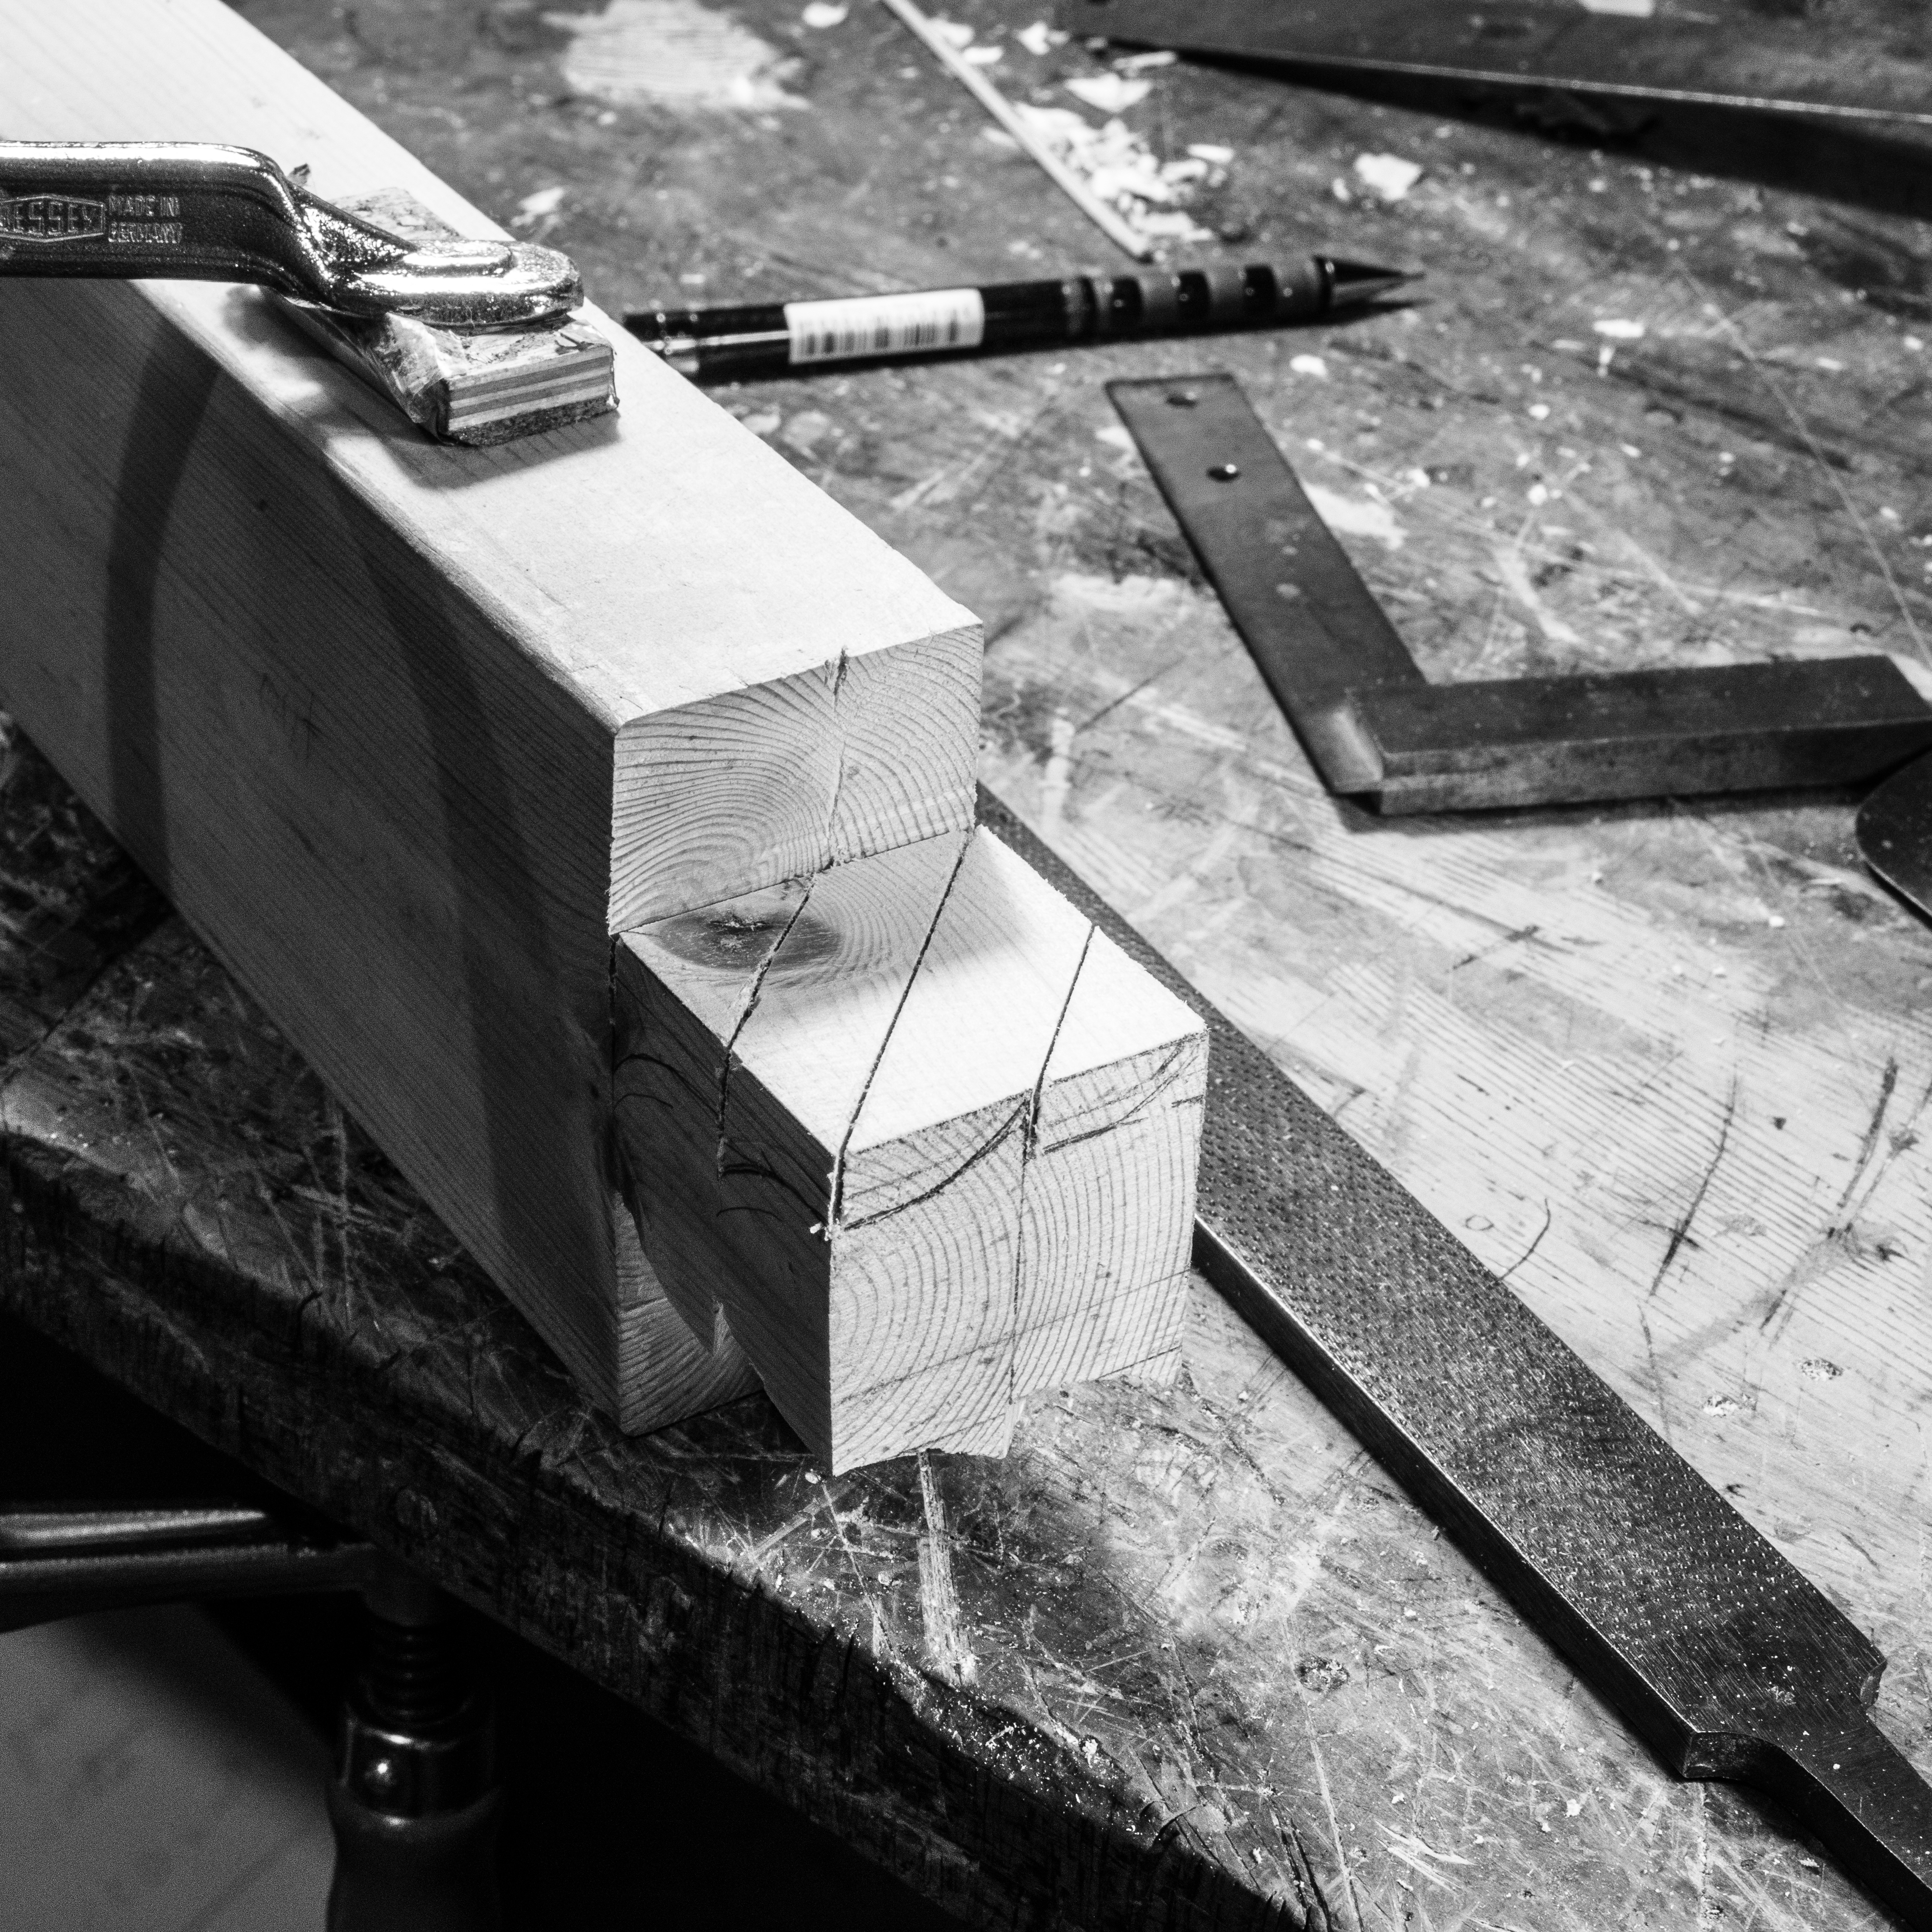
The photos below show the process I followed to try to understand the basic building blocks.
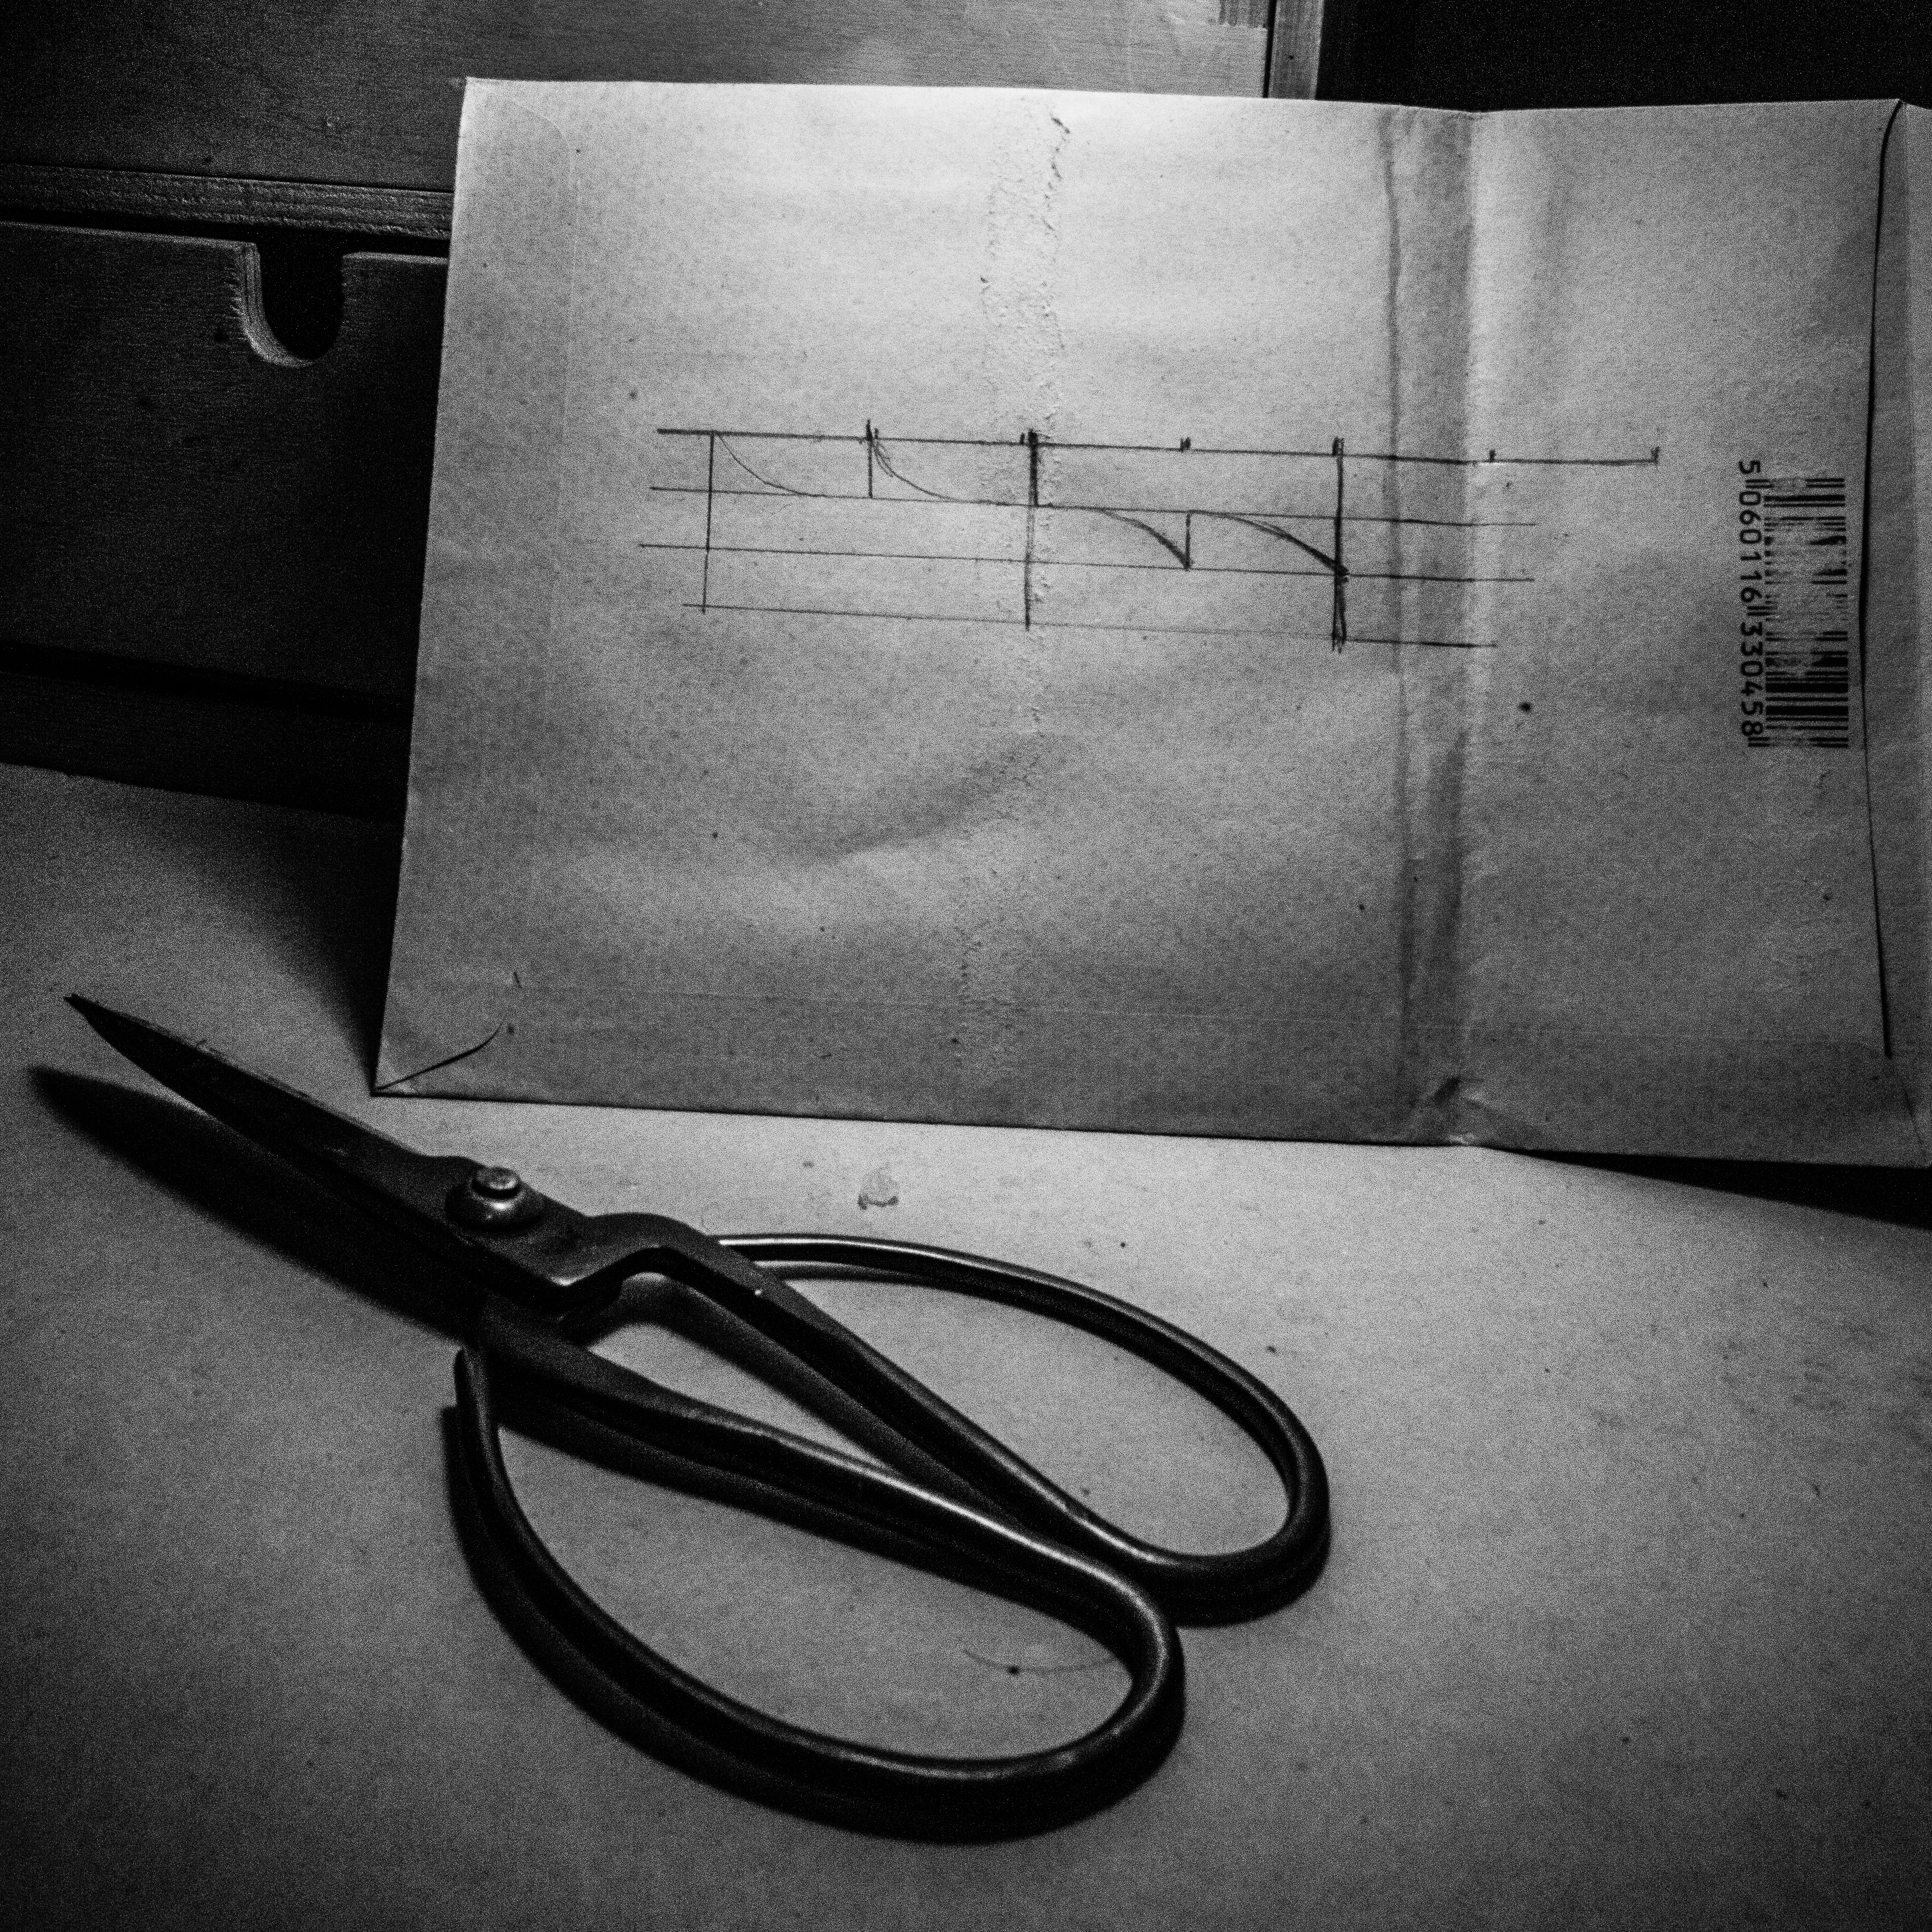
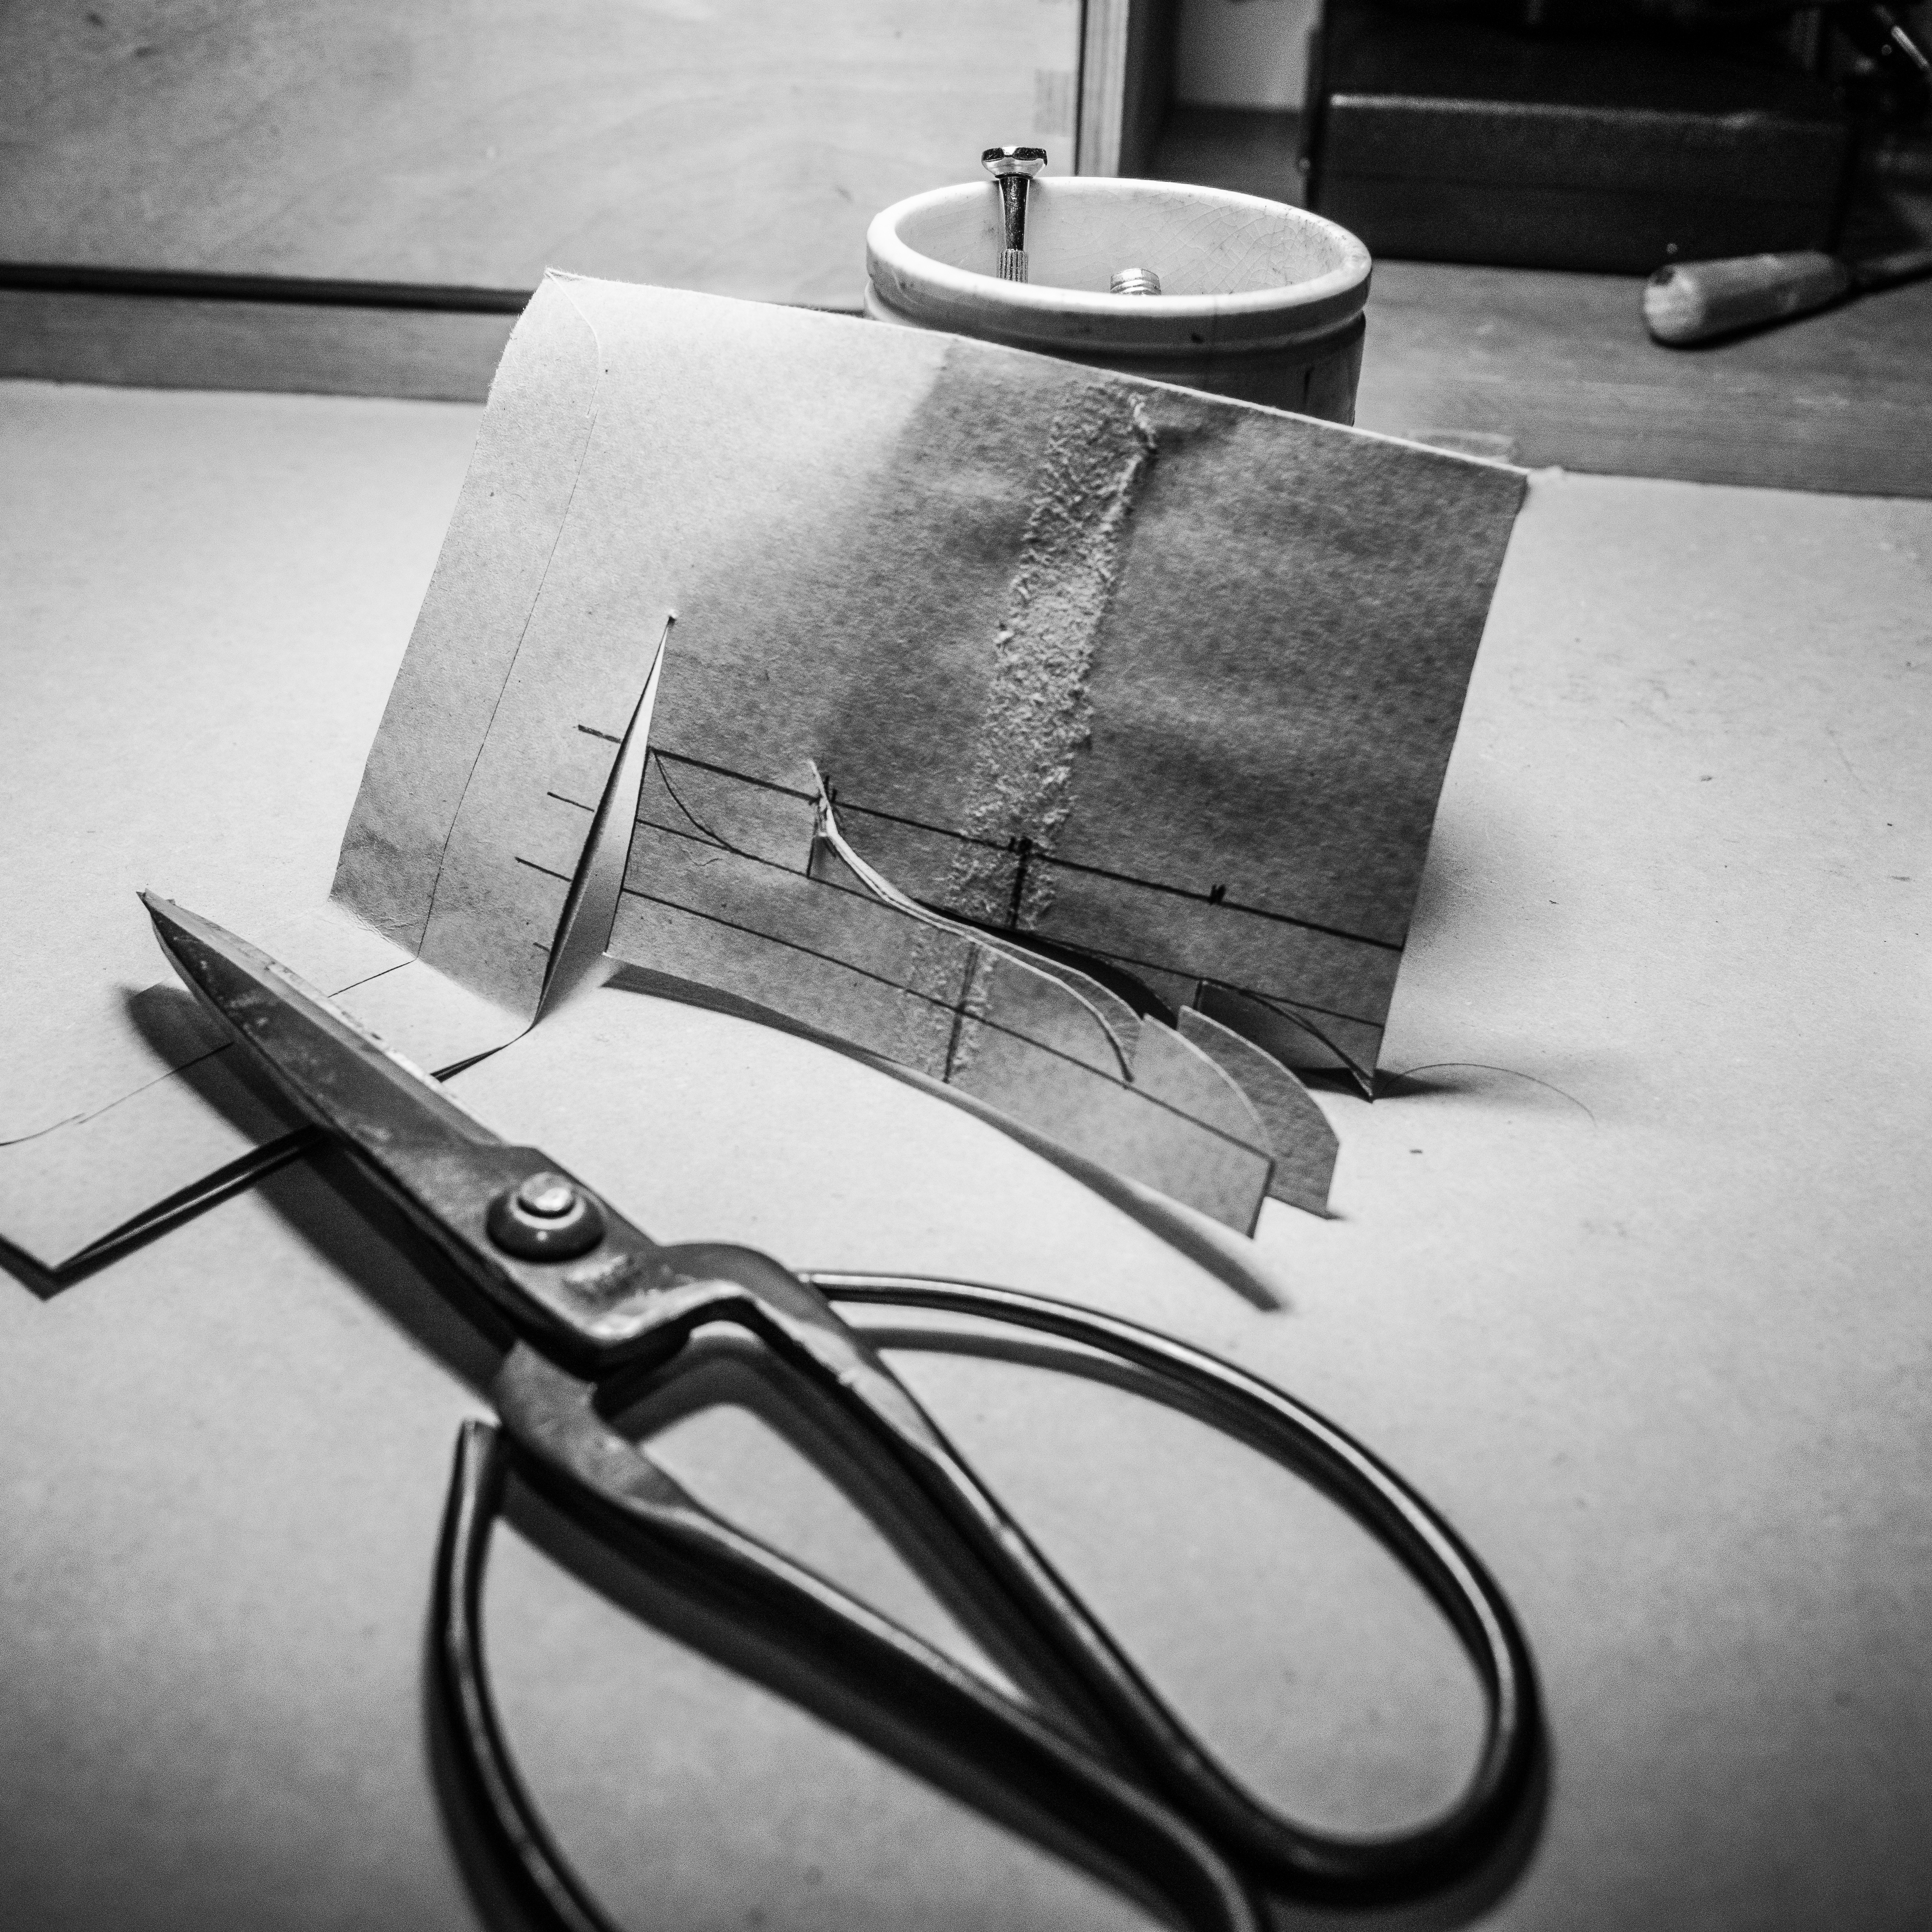

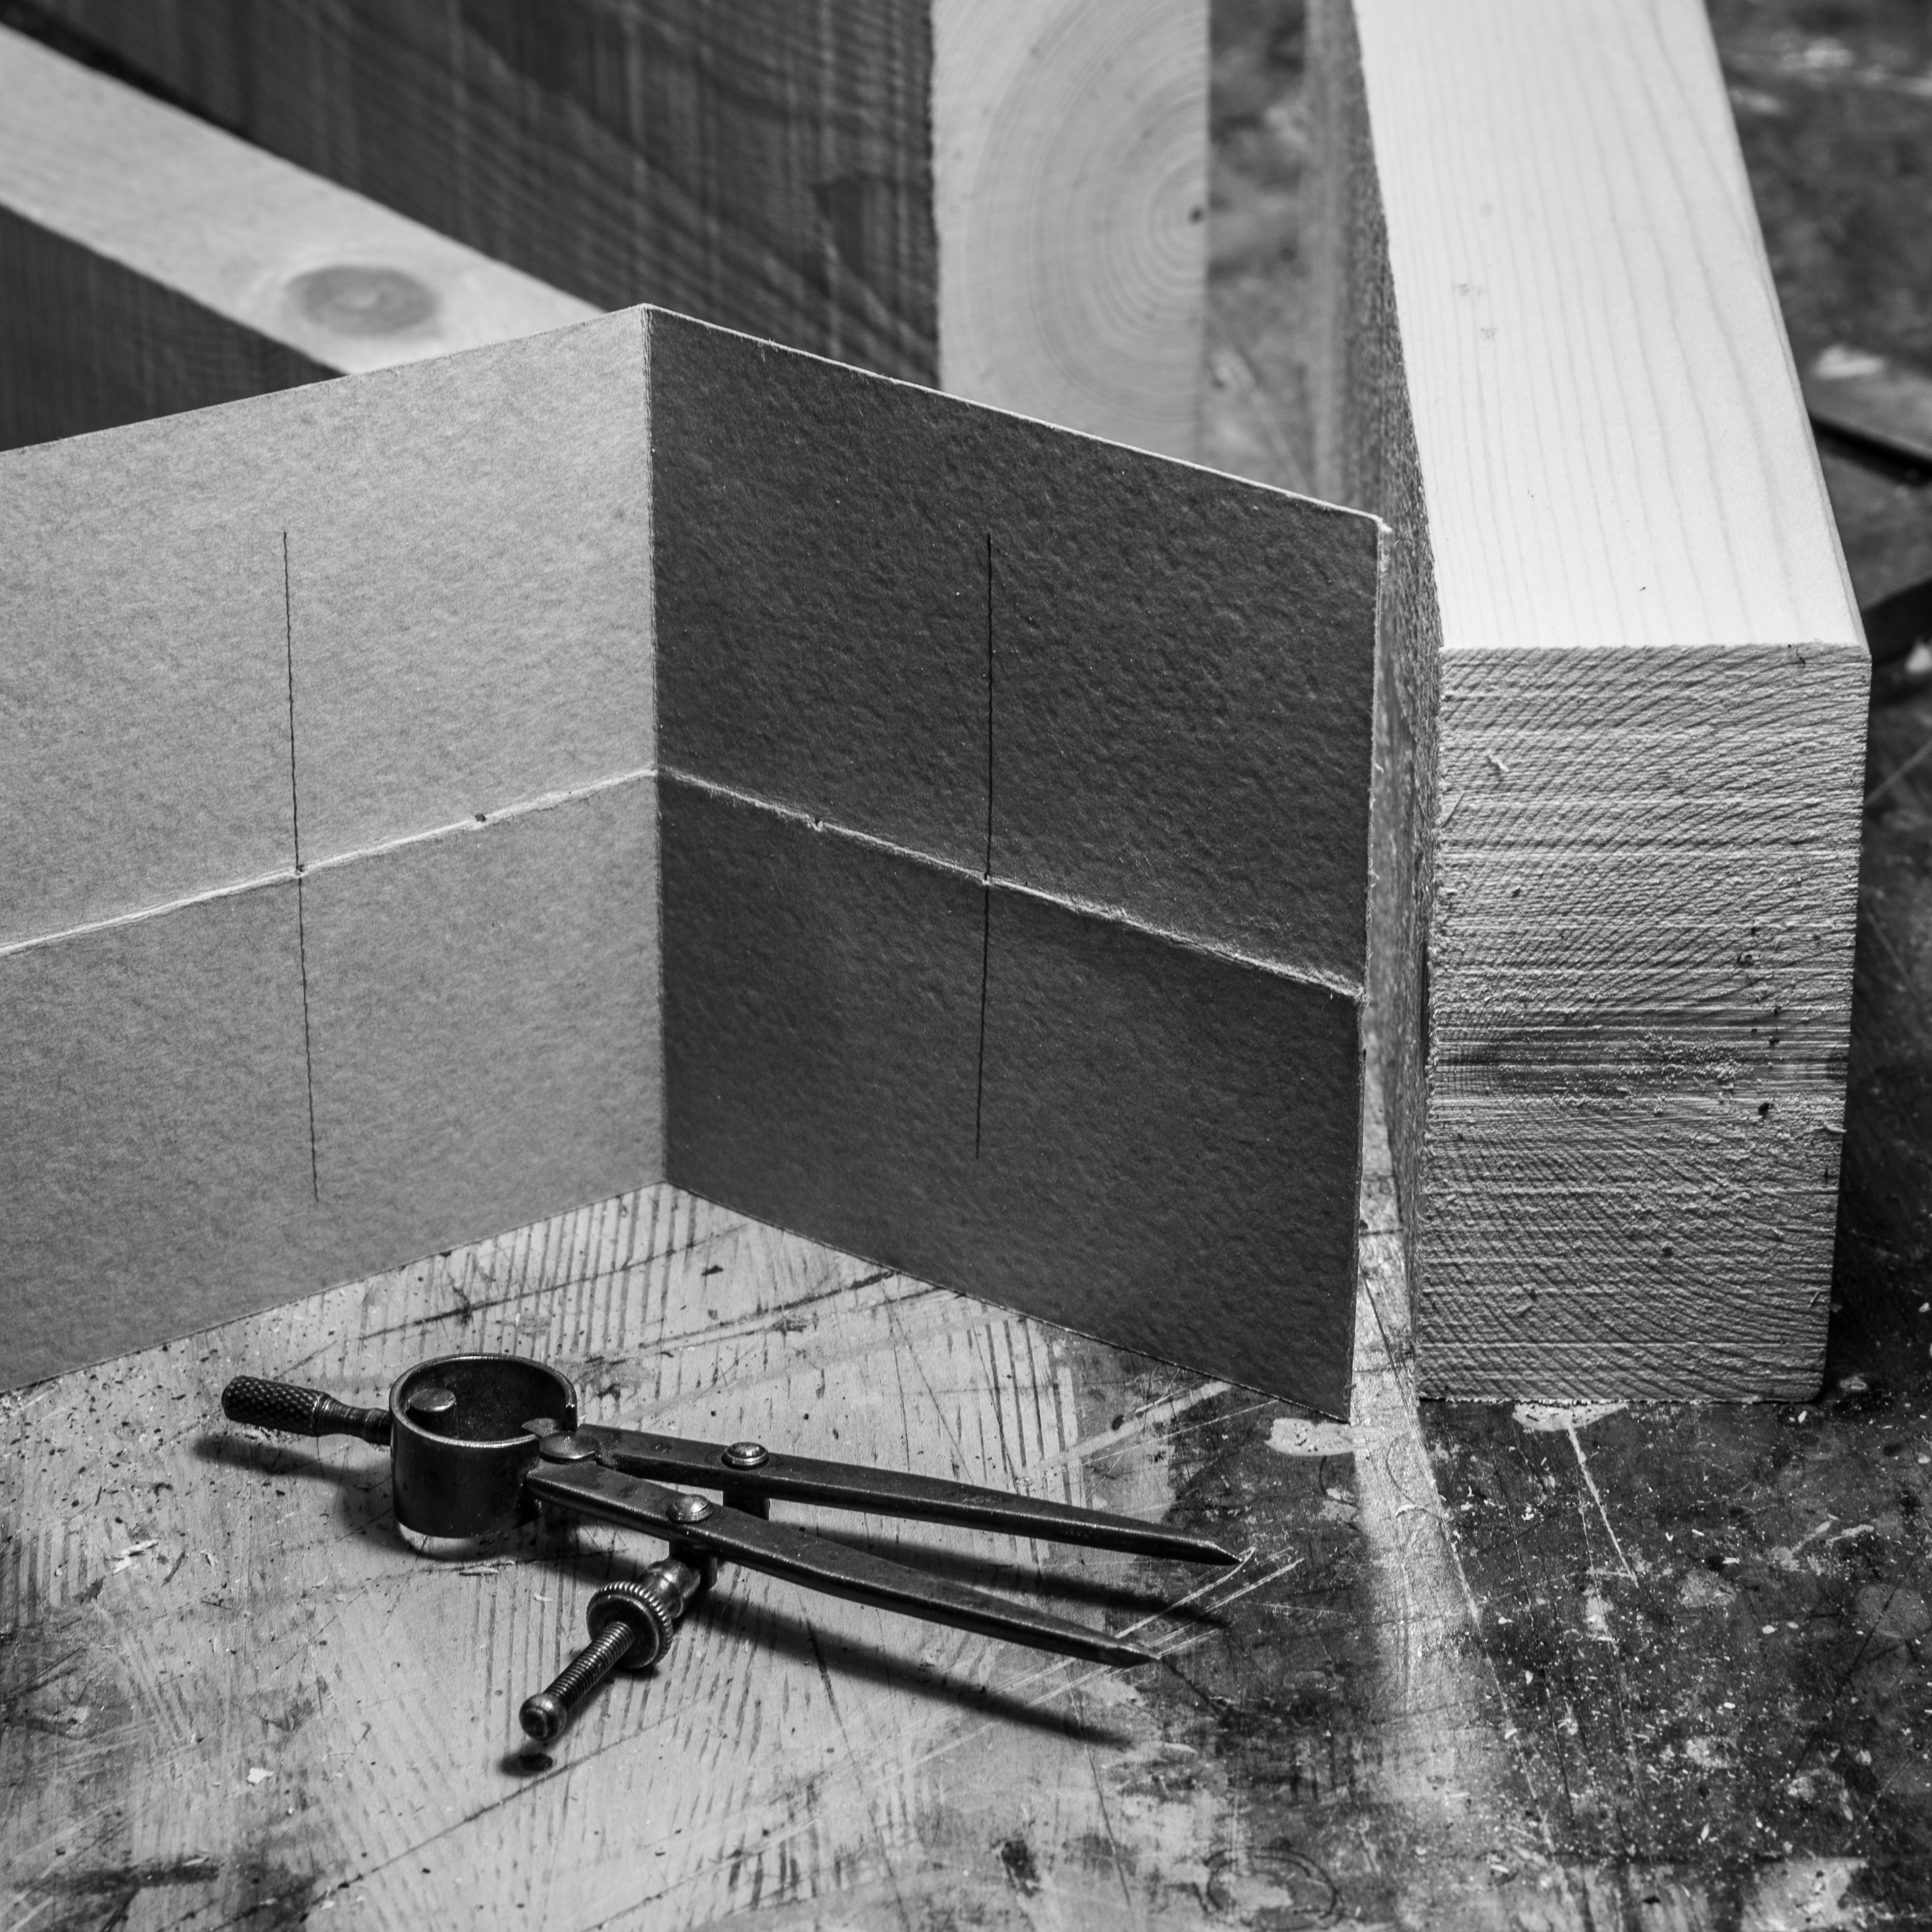
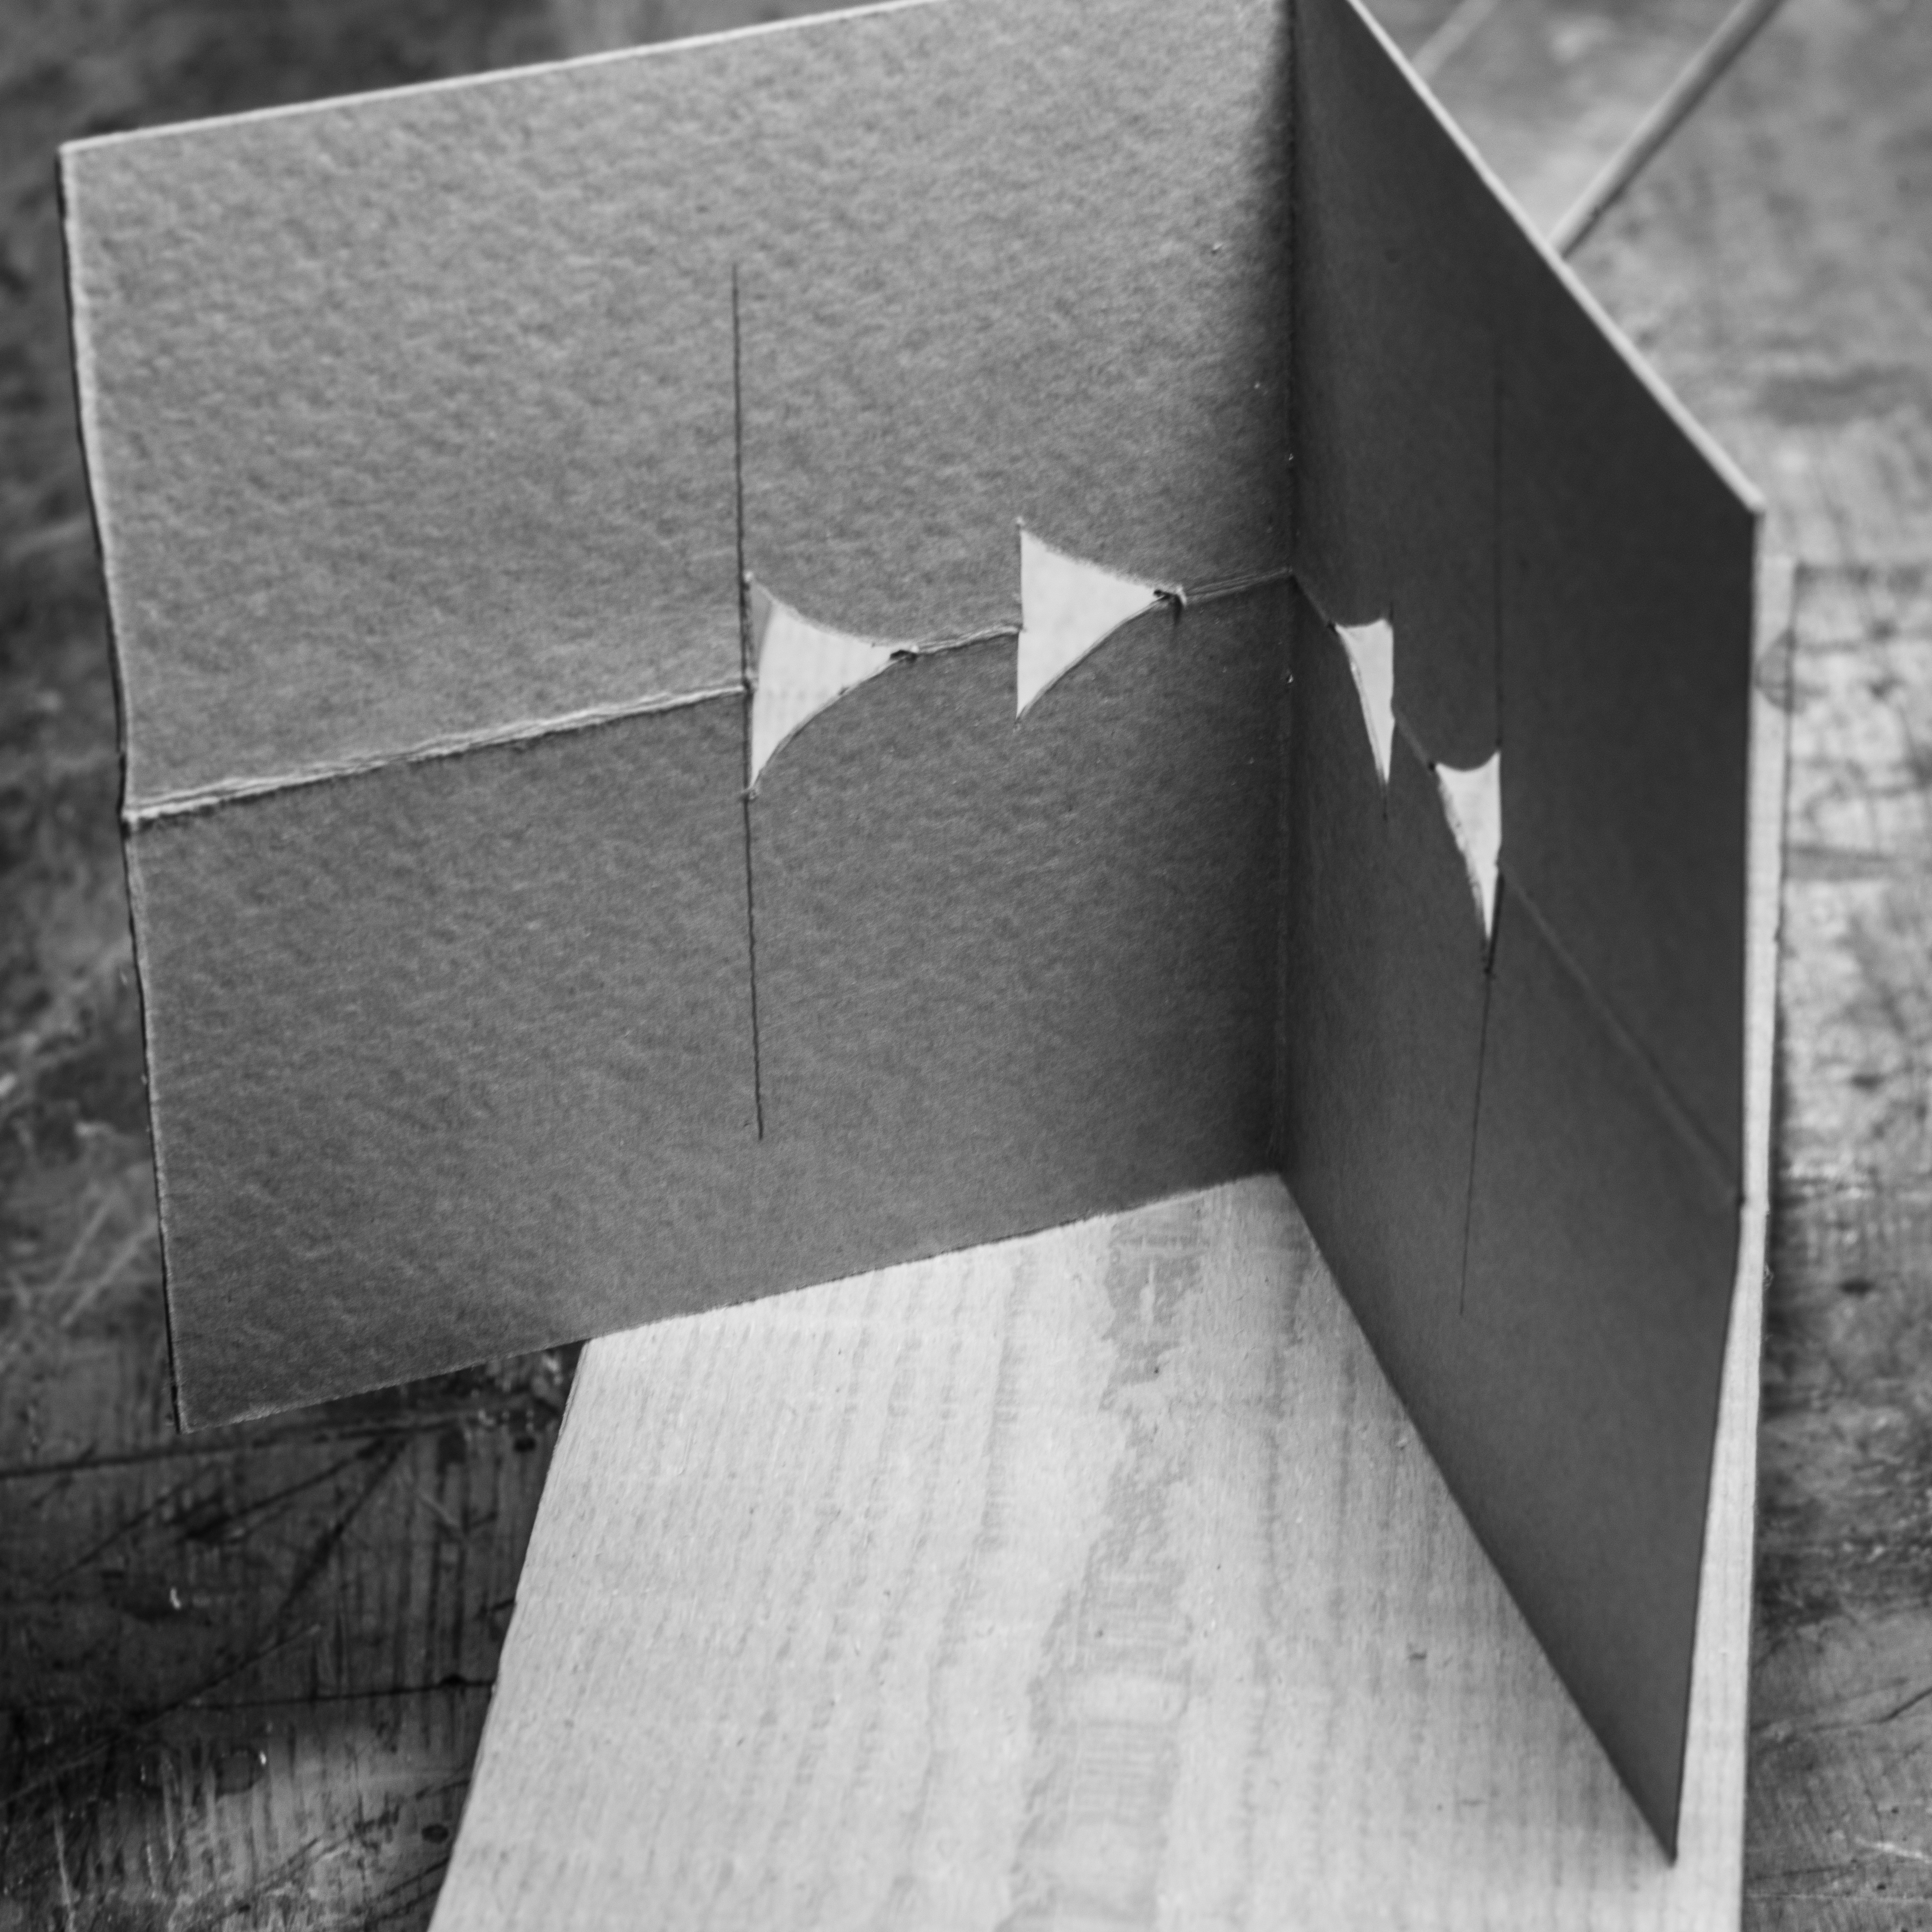
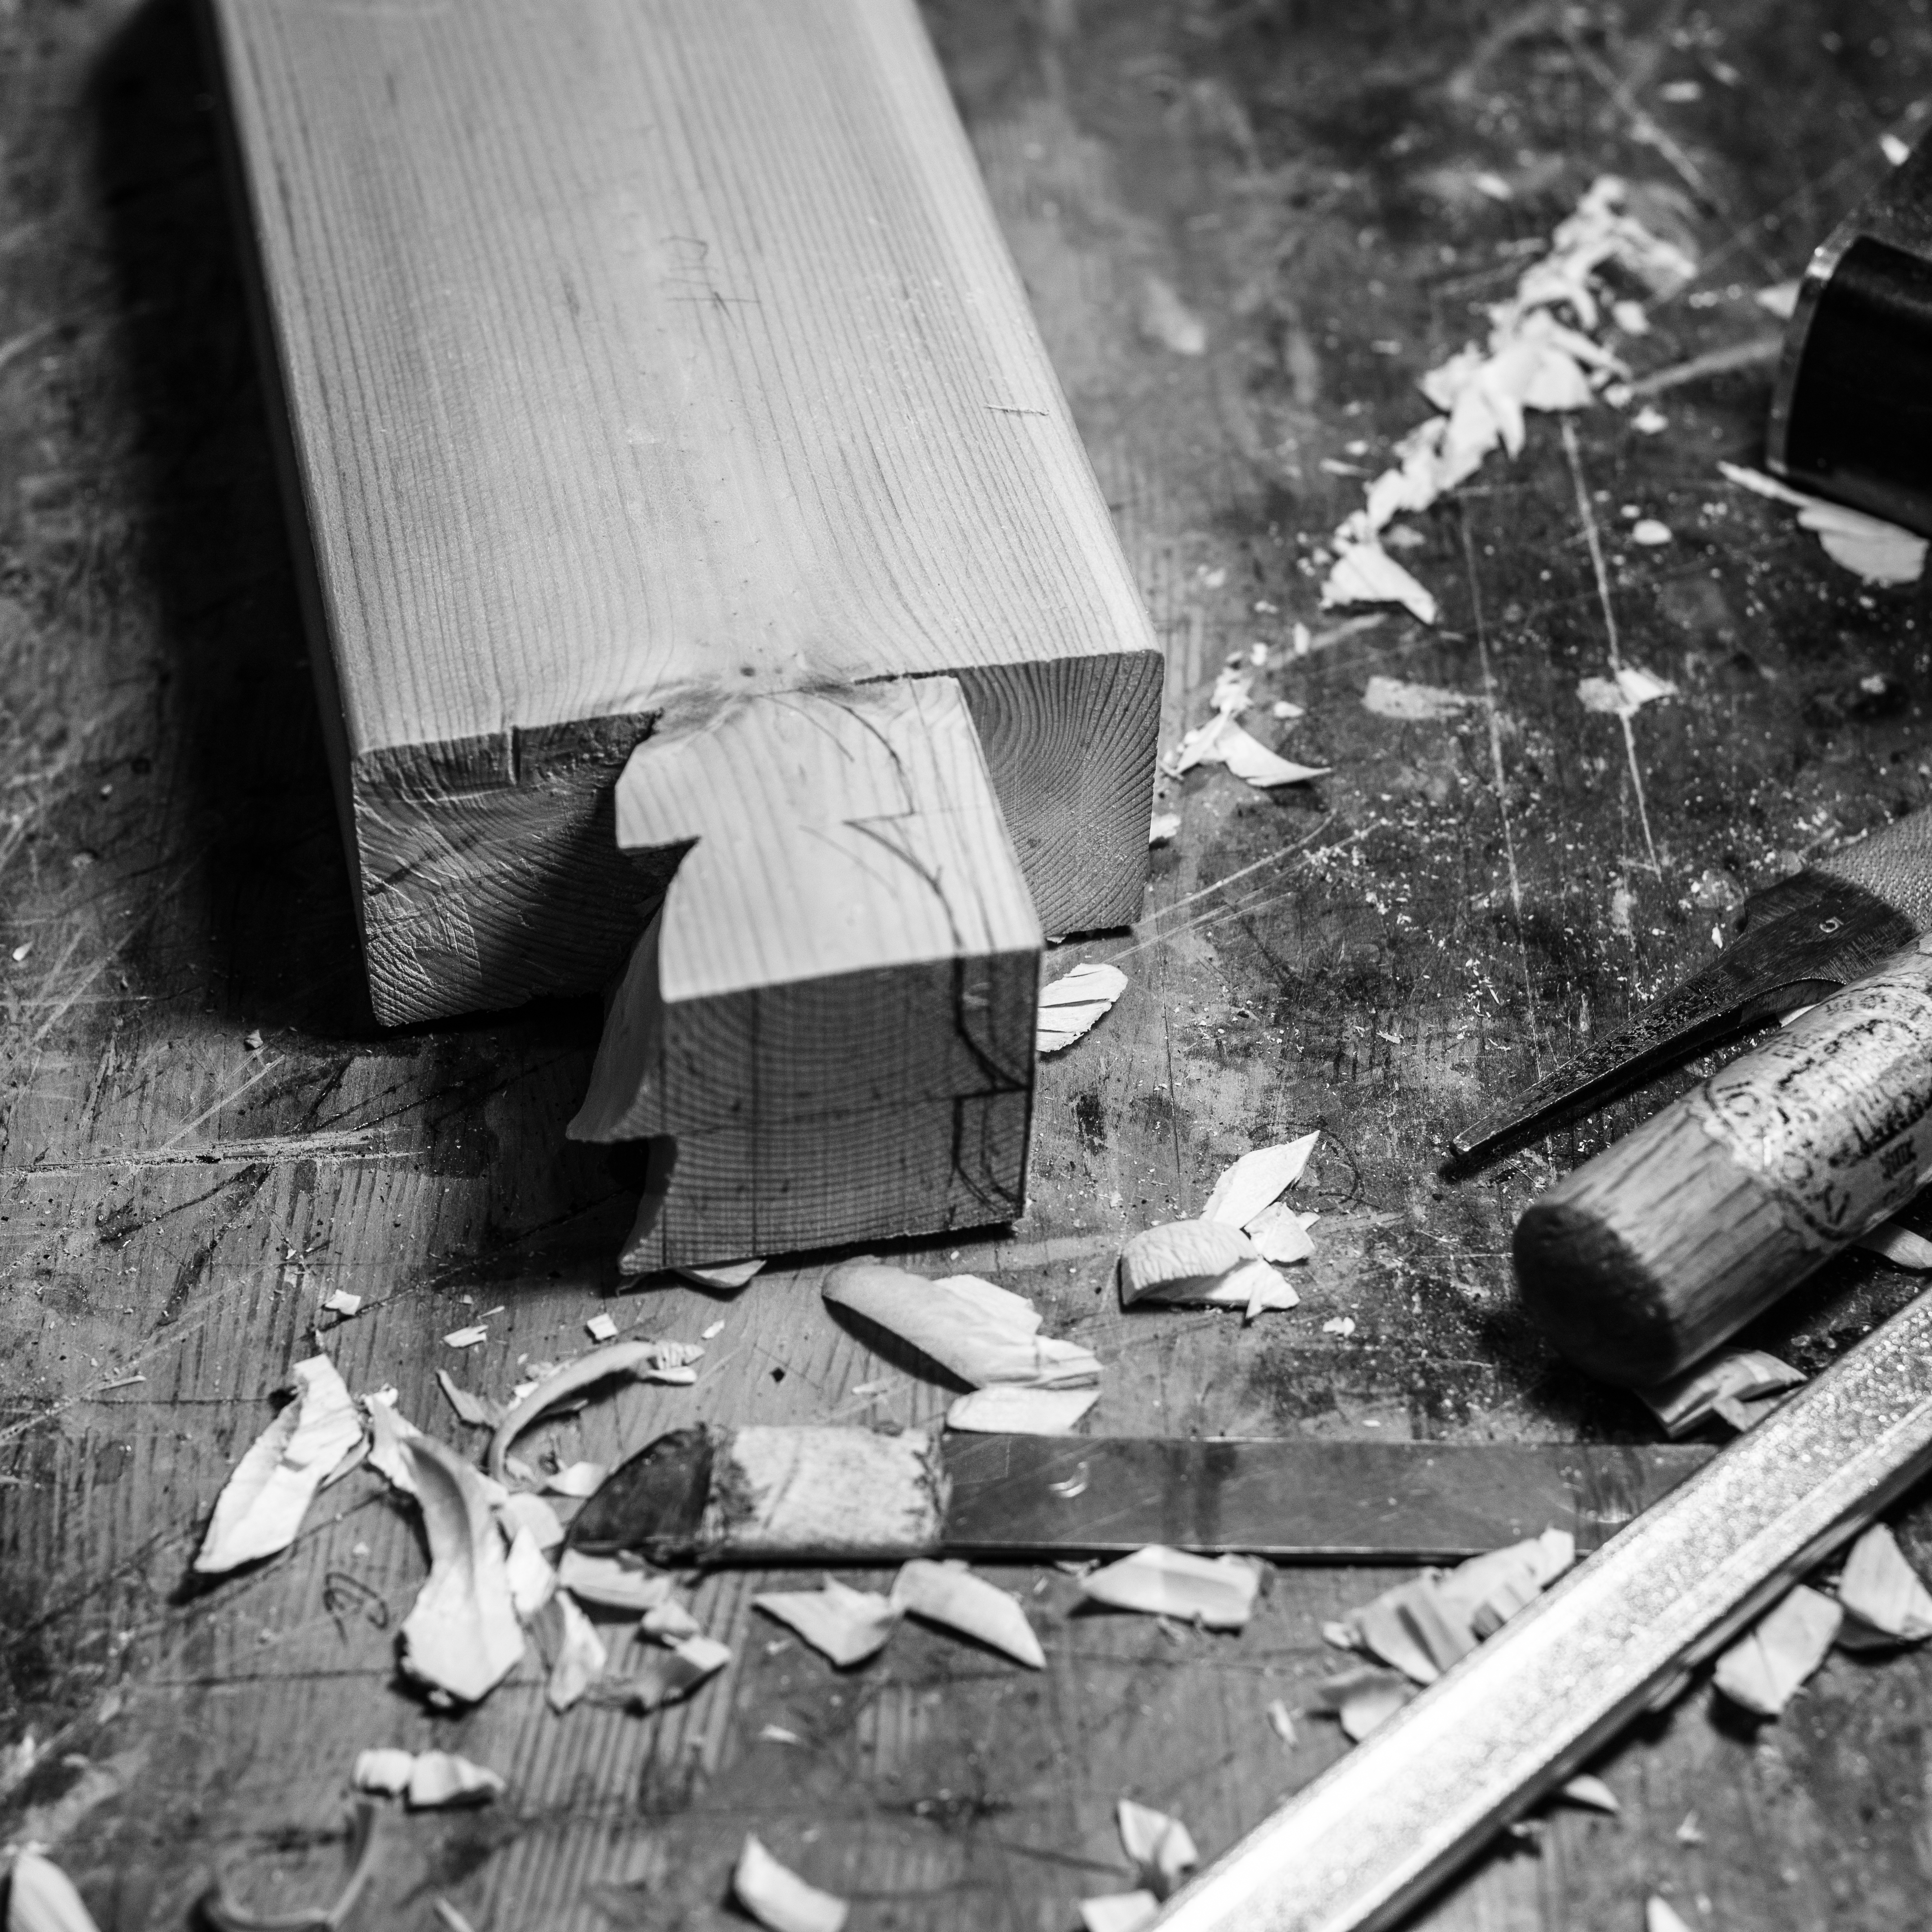

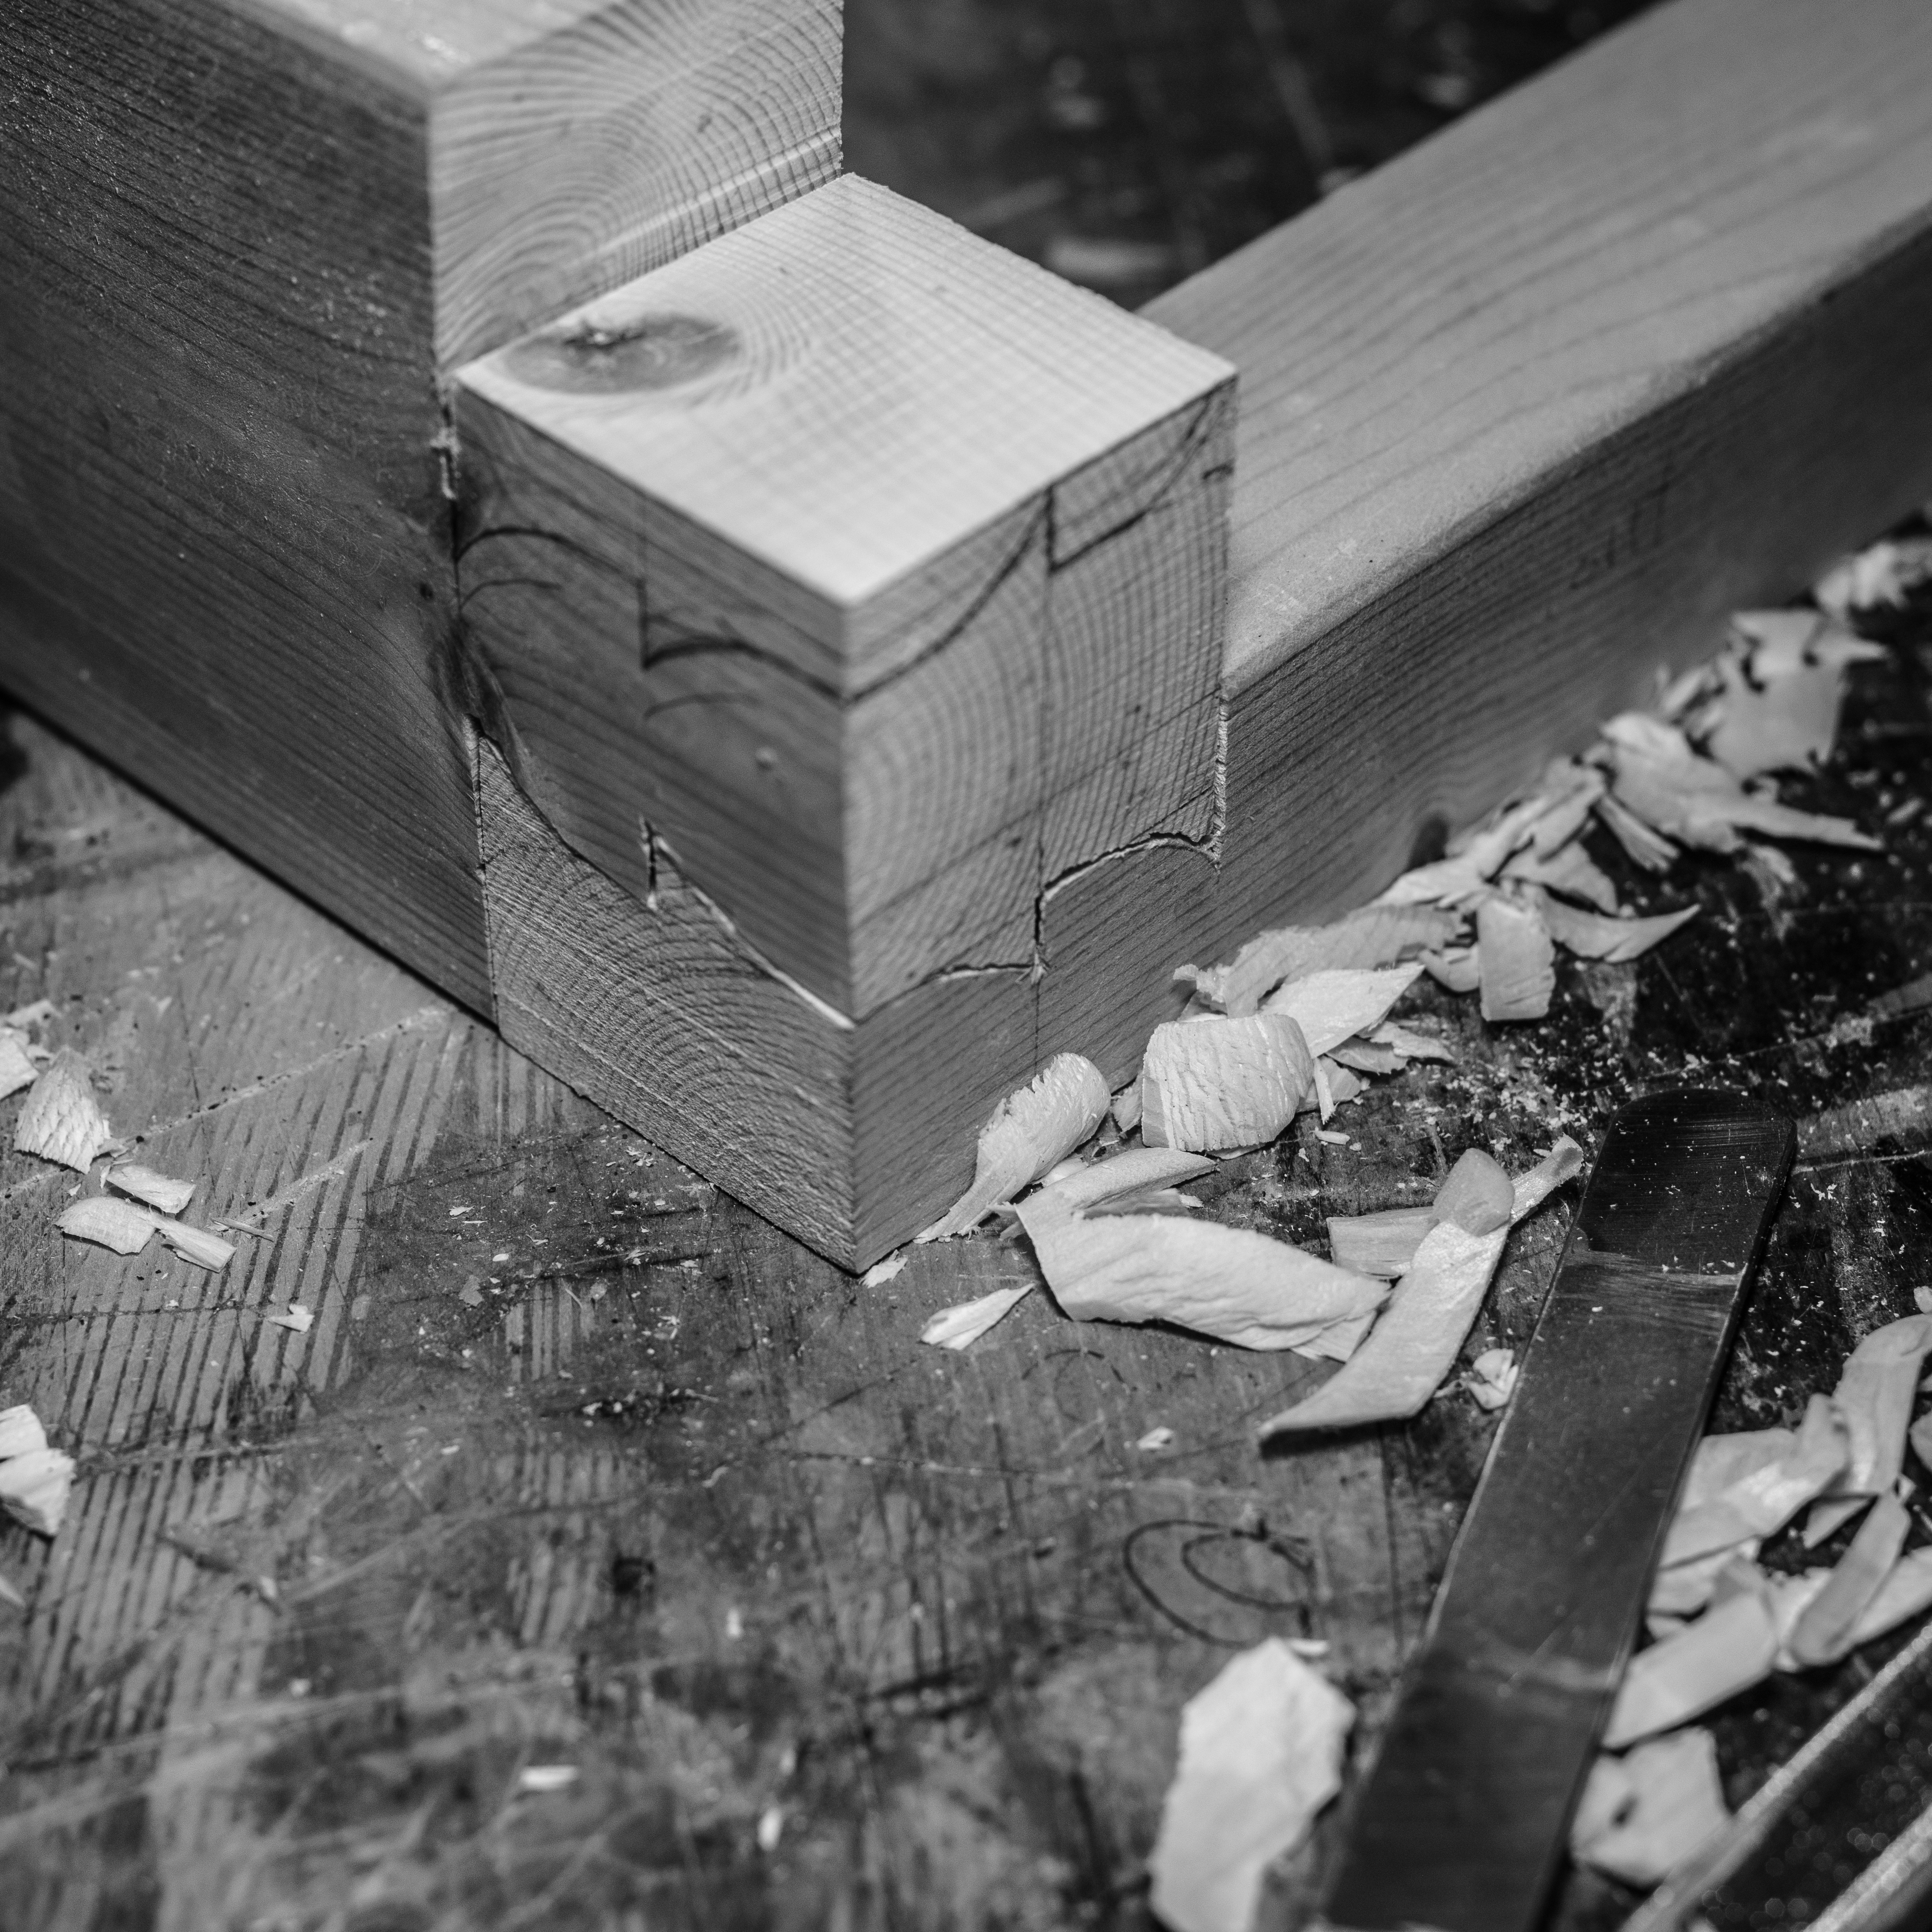

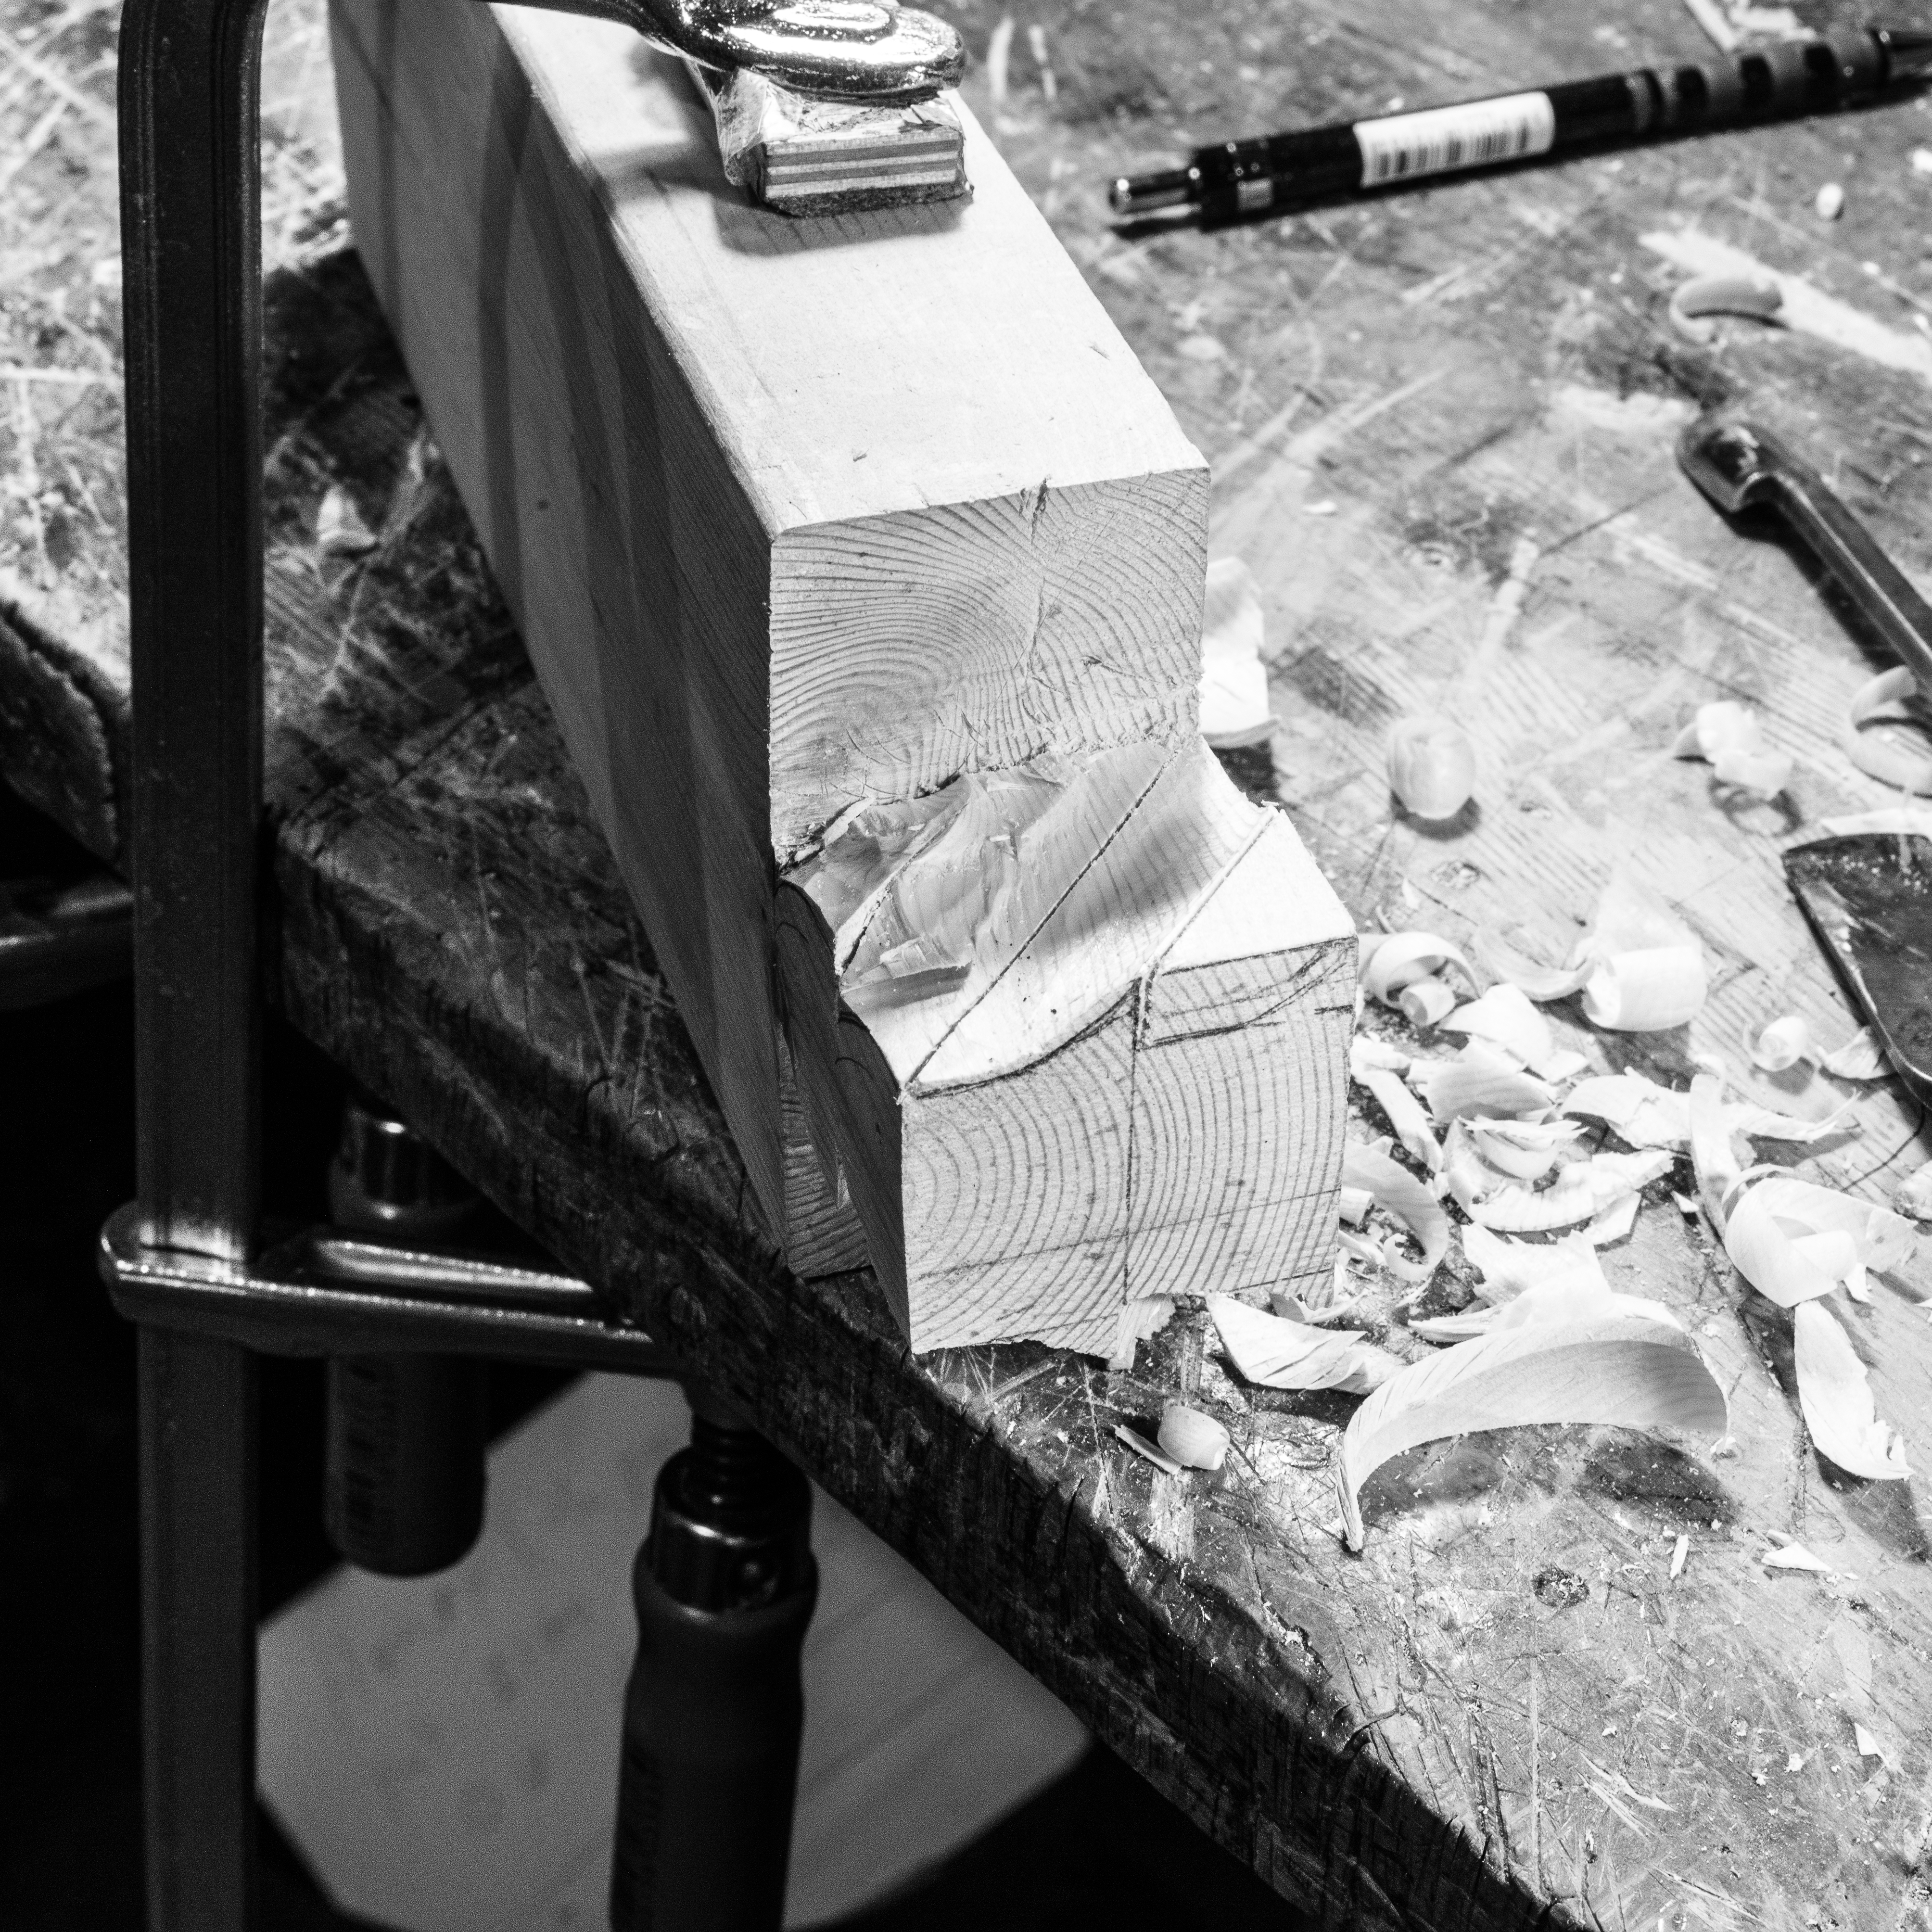

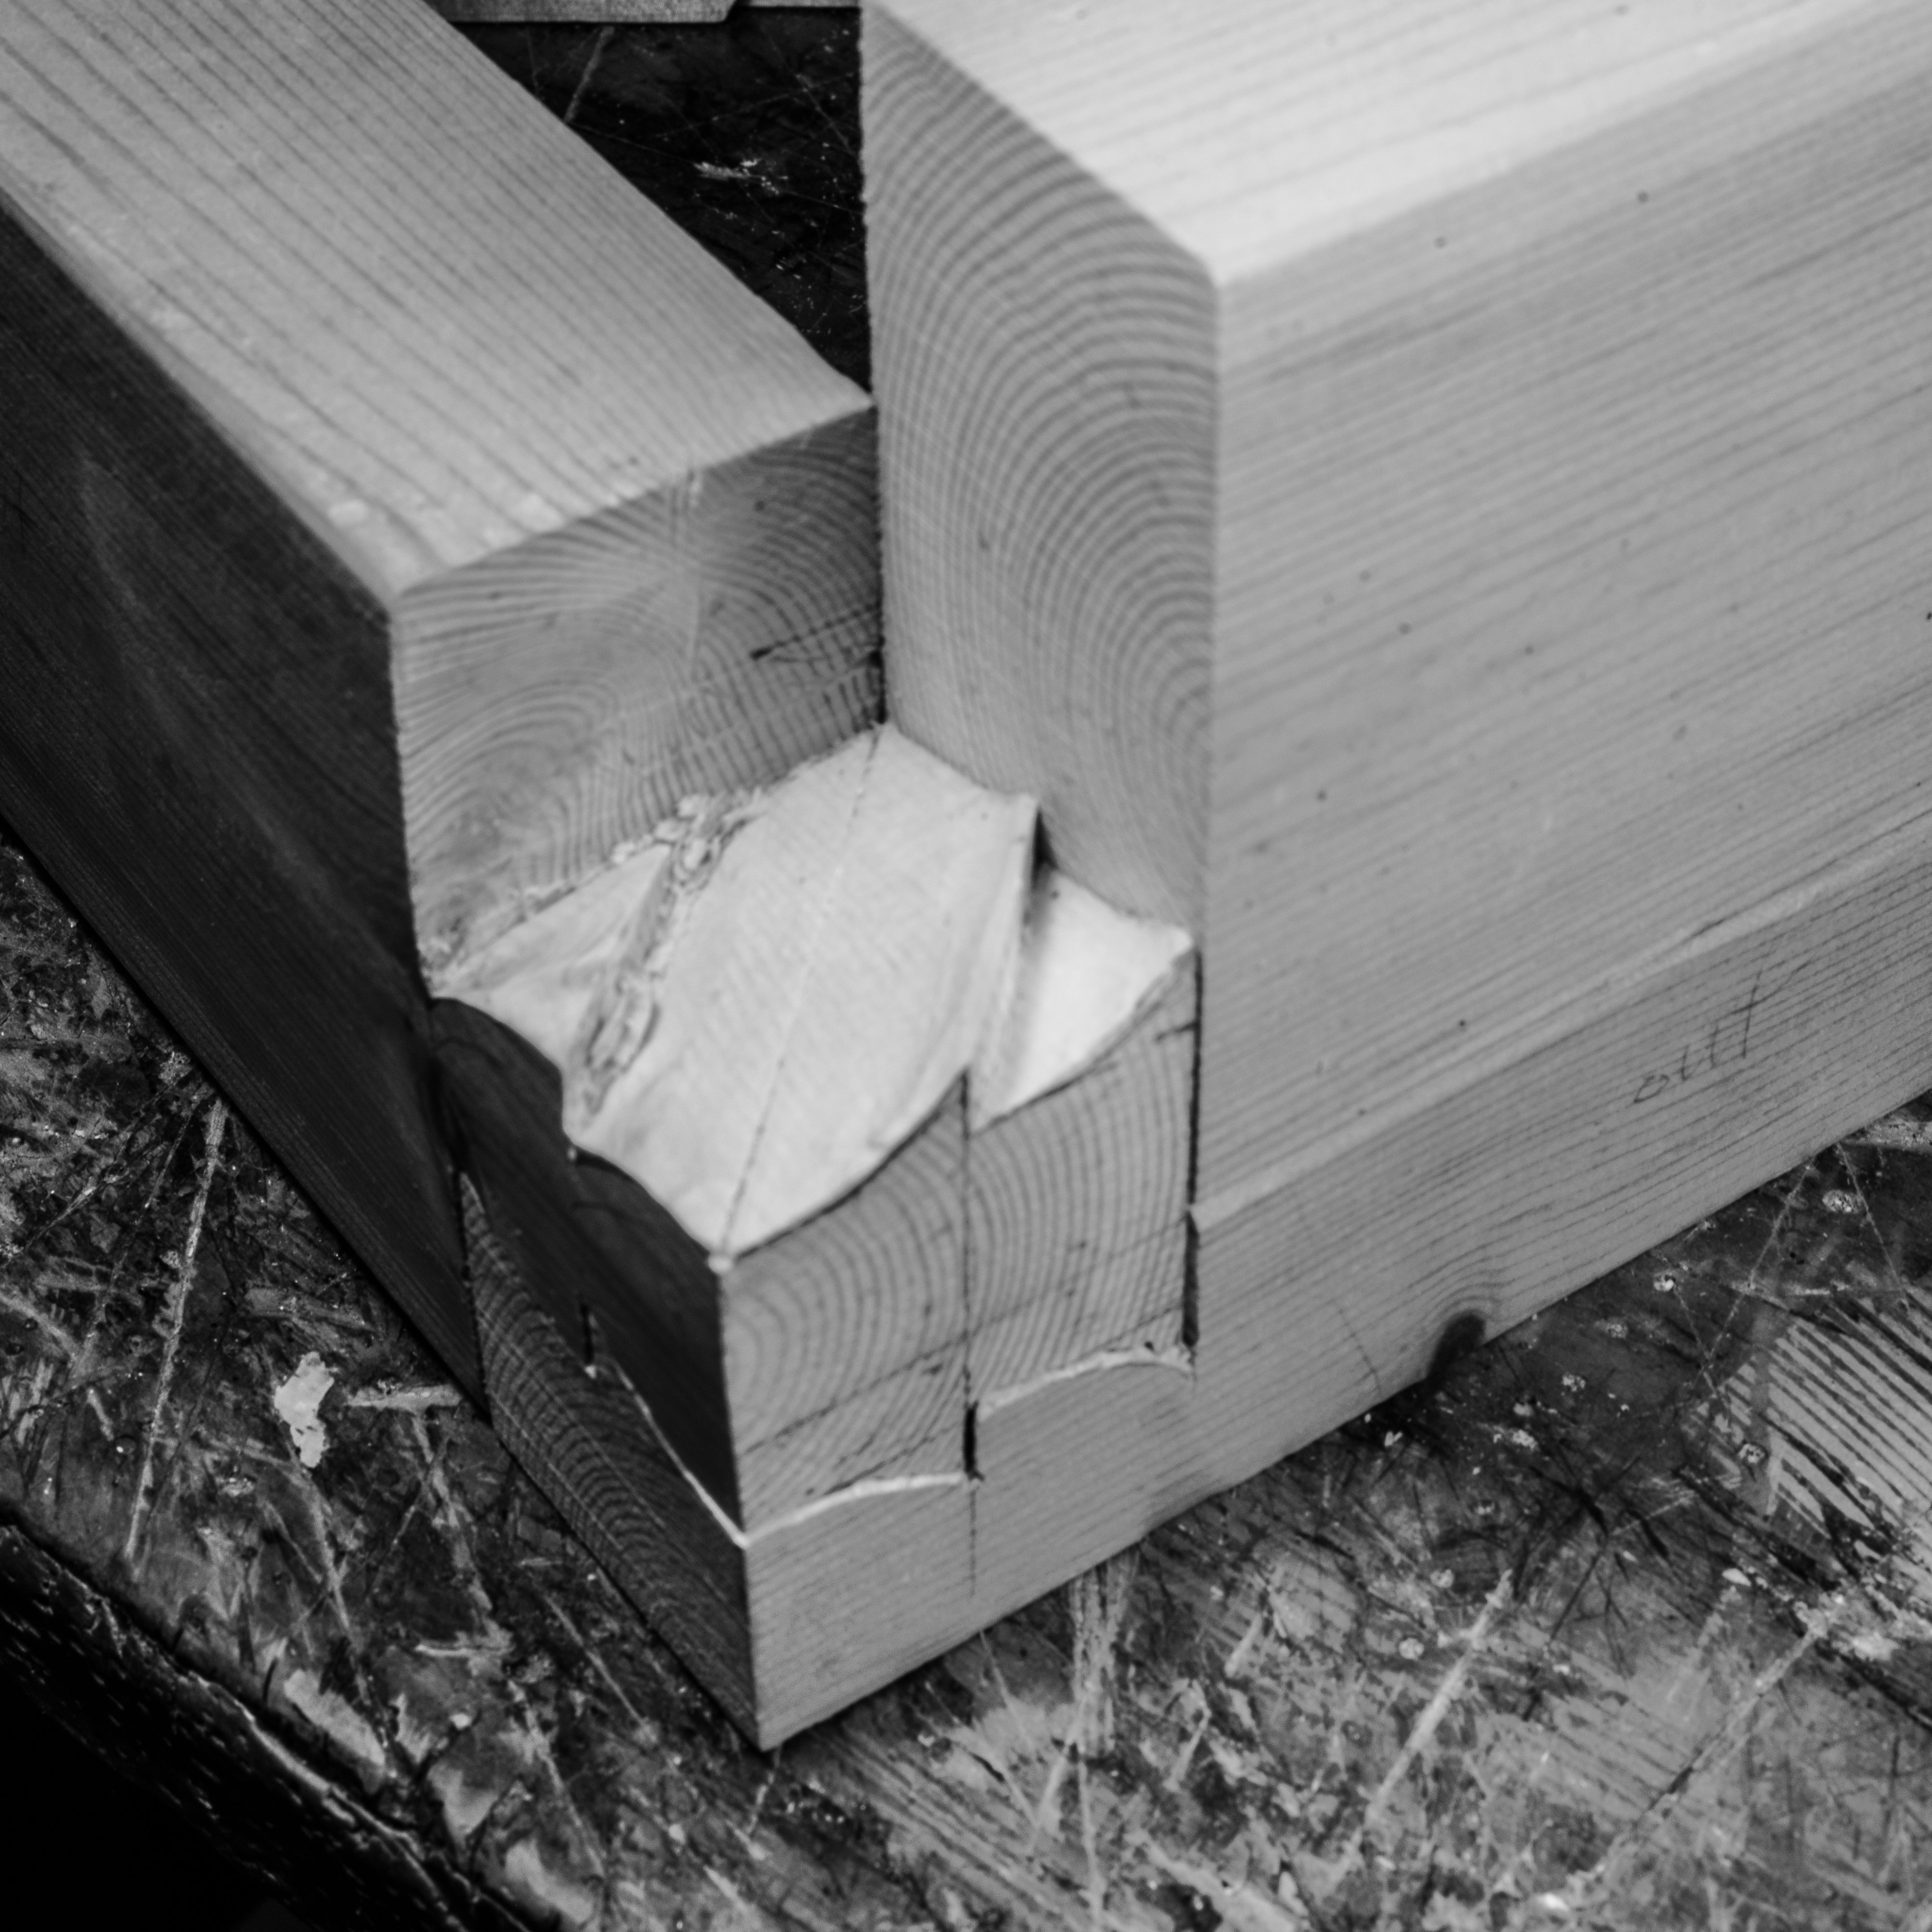
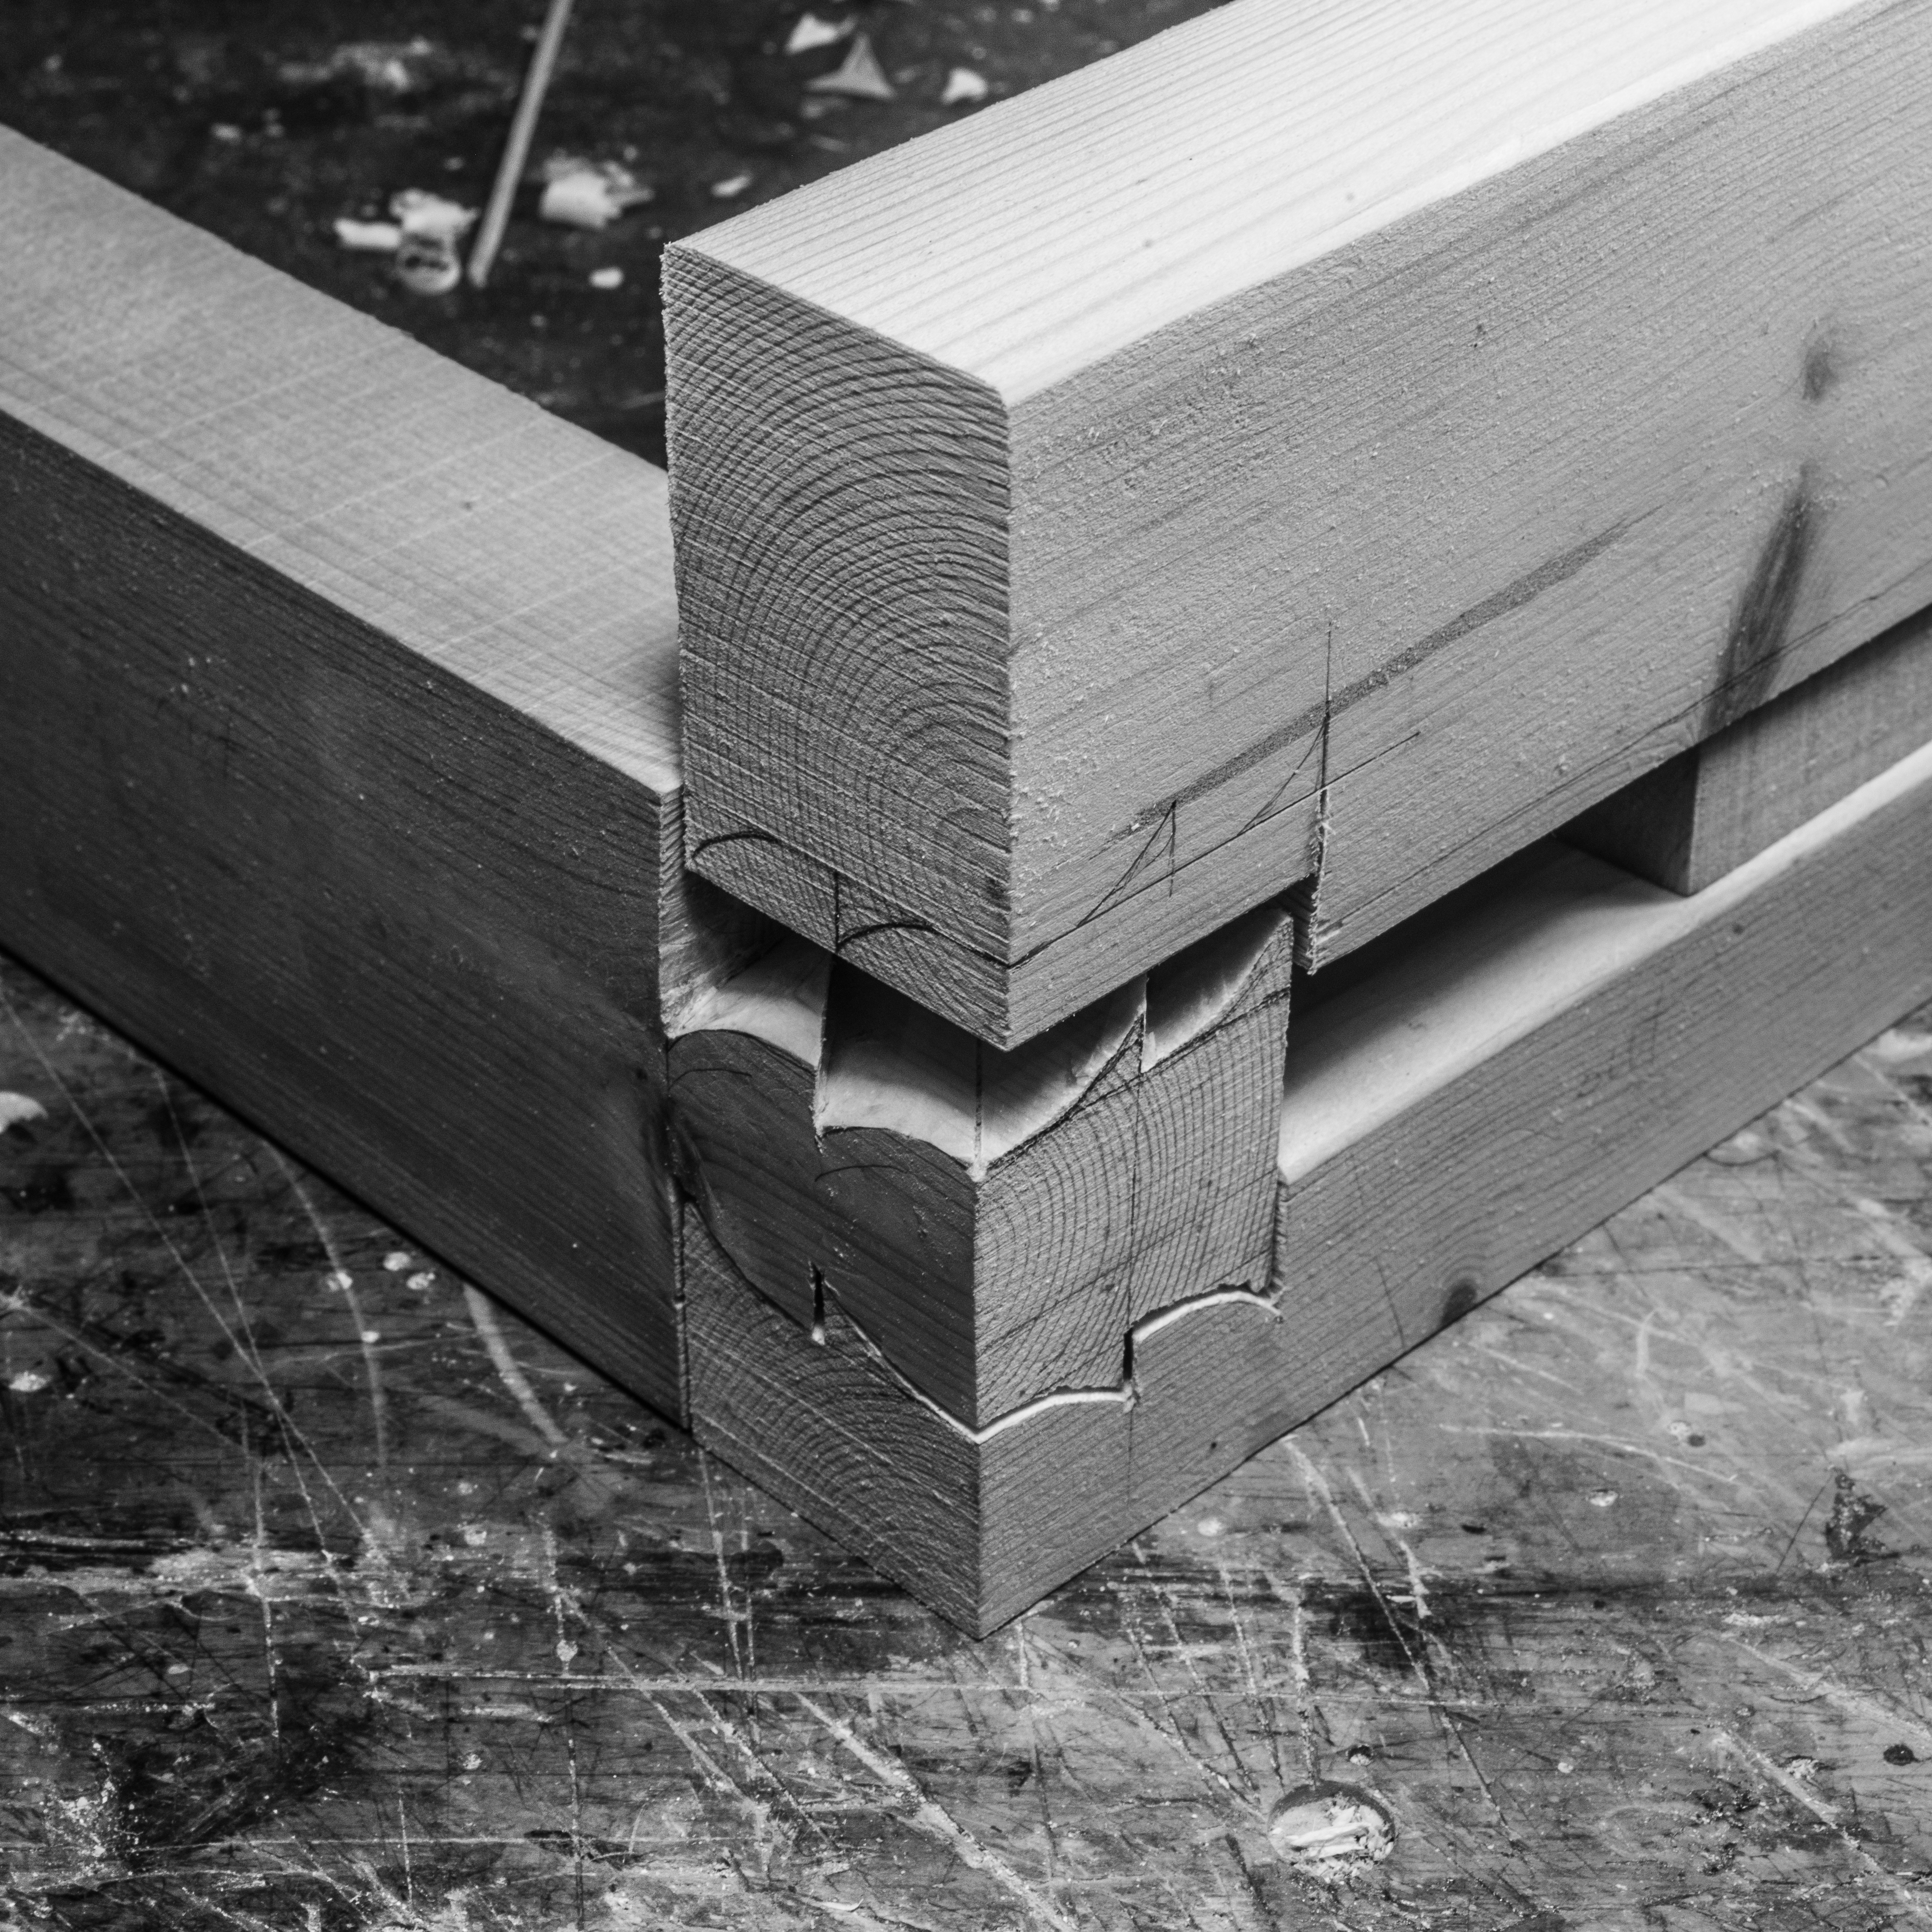
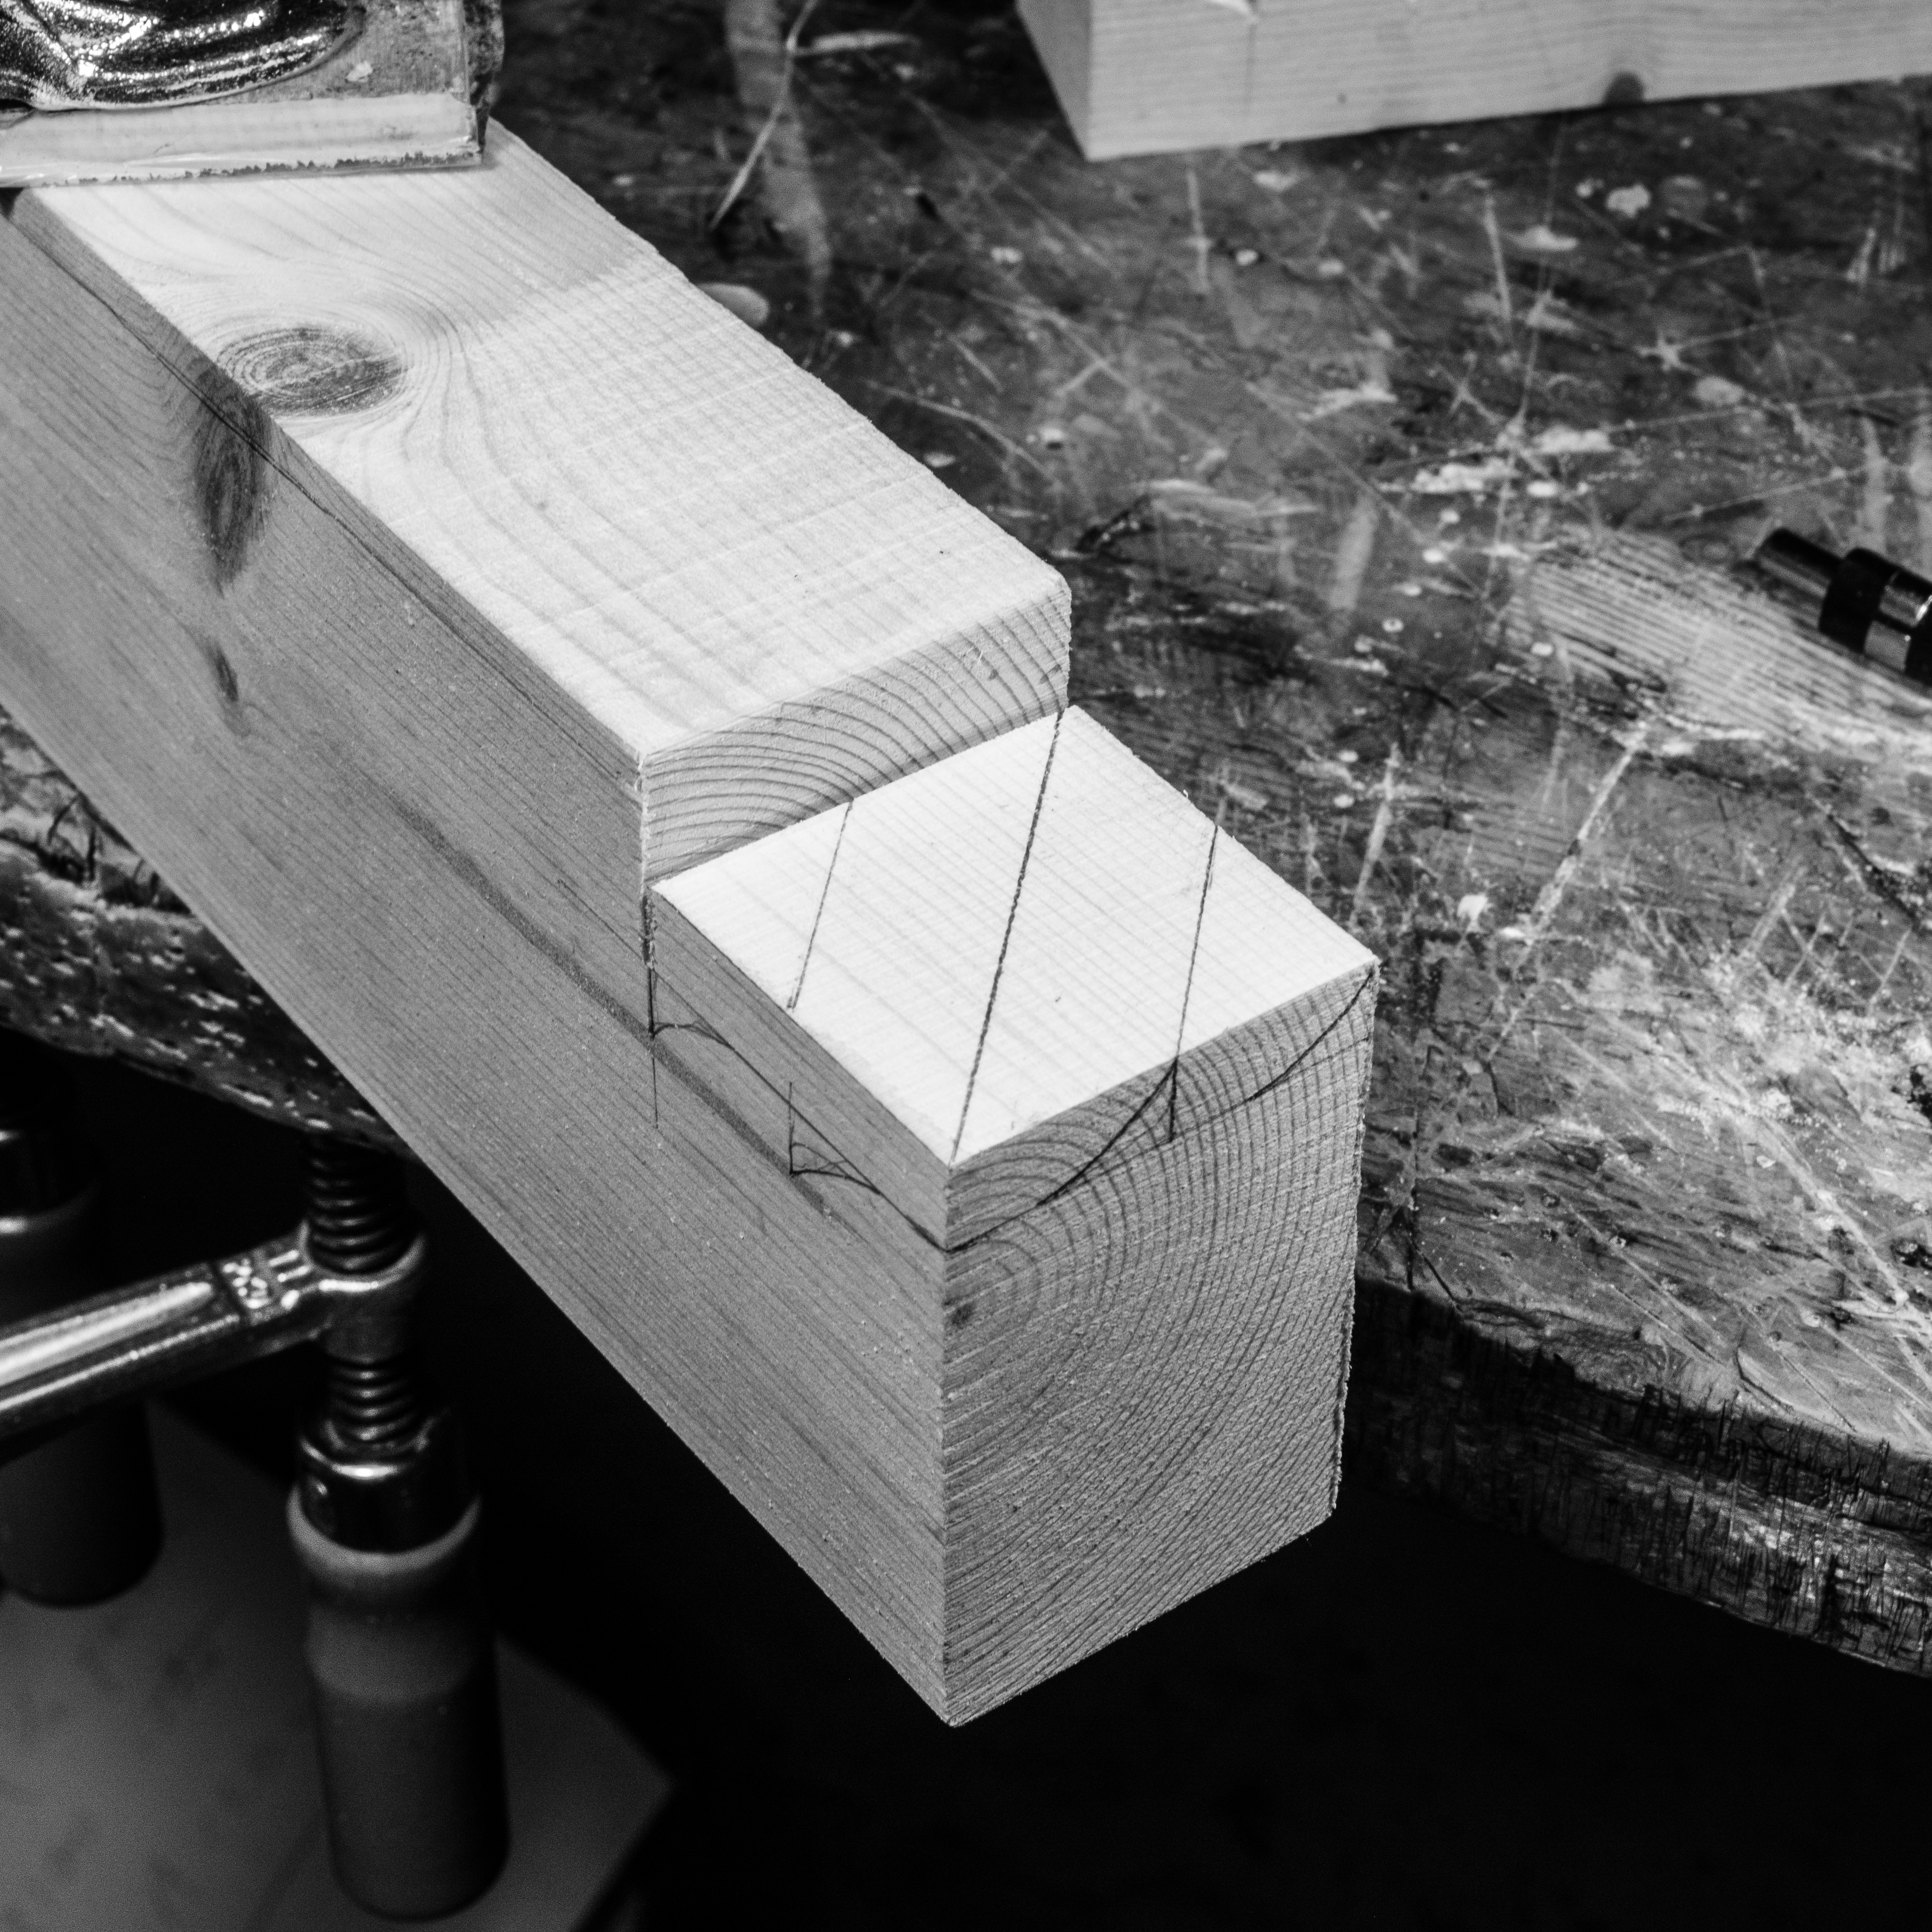
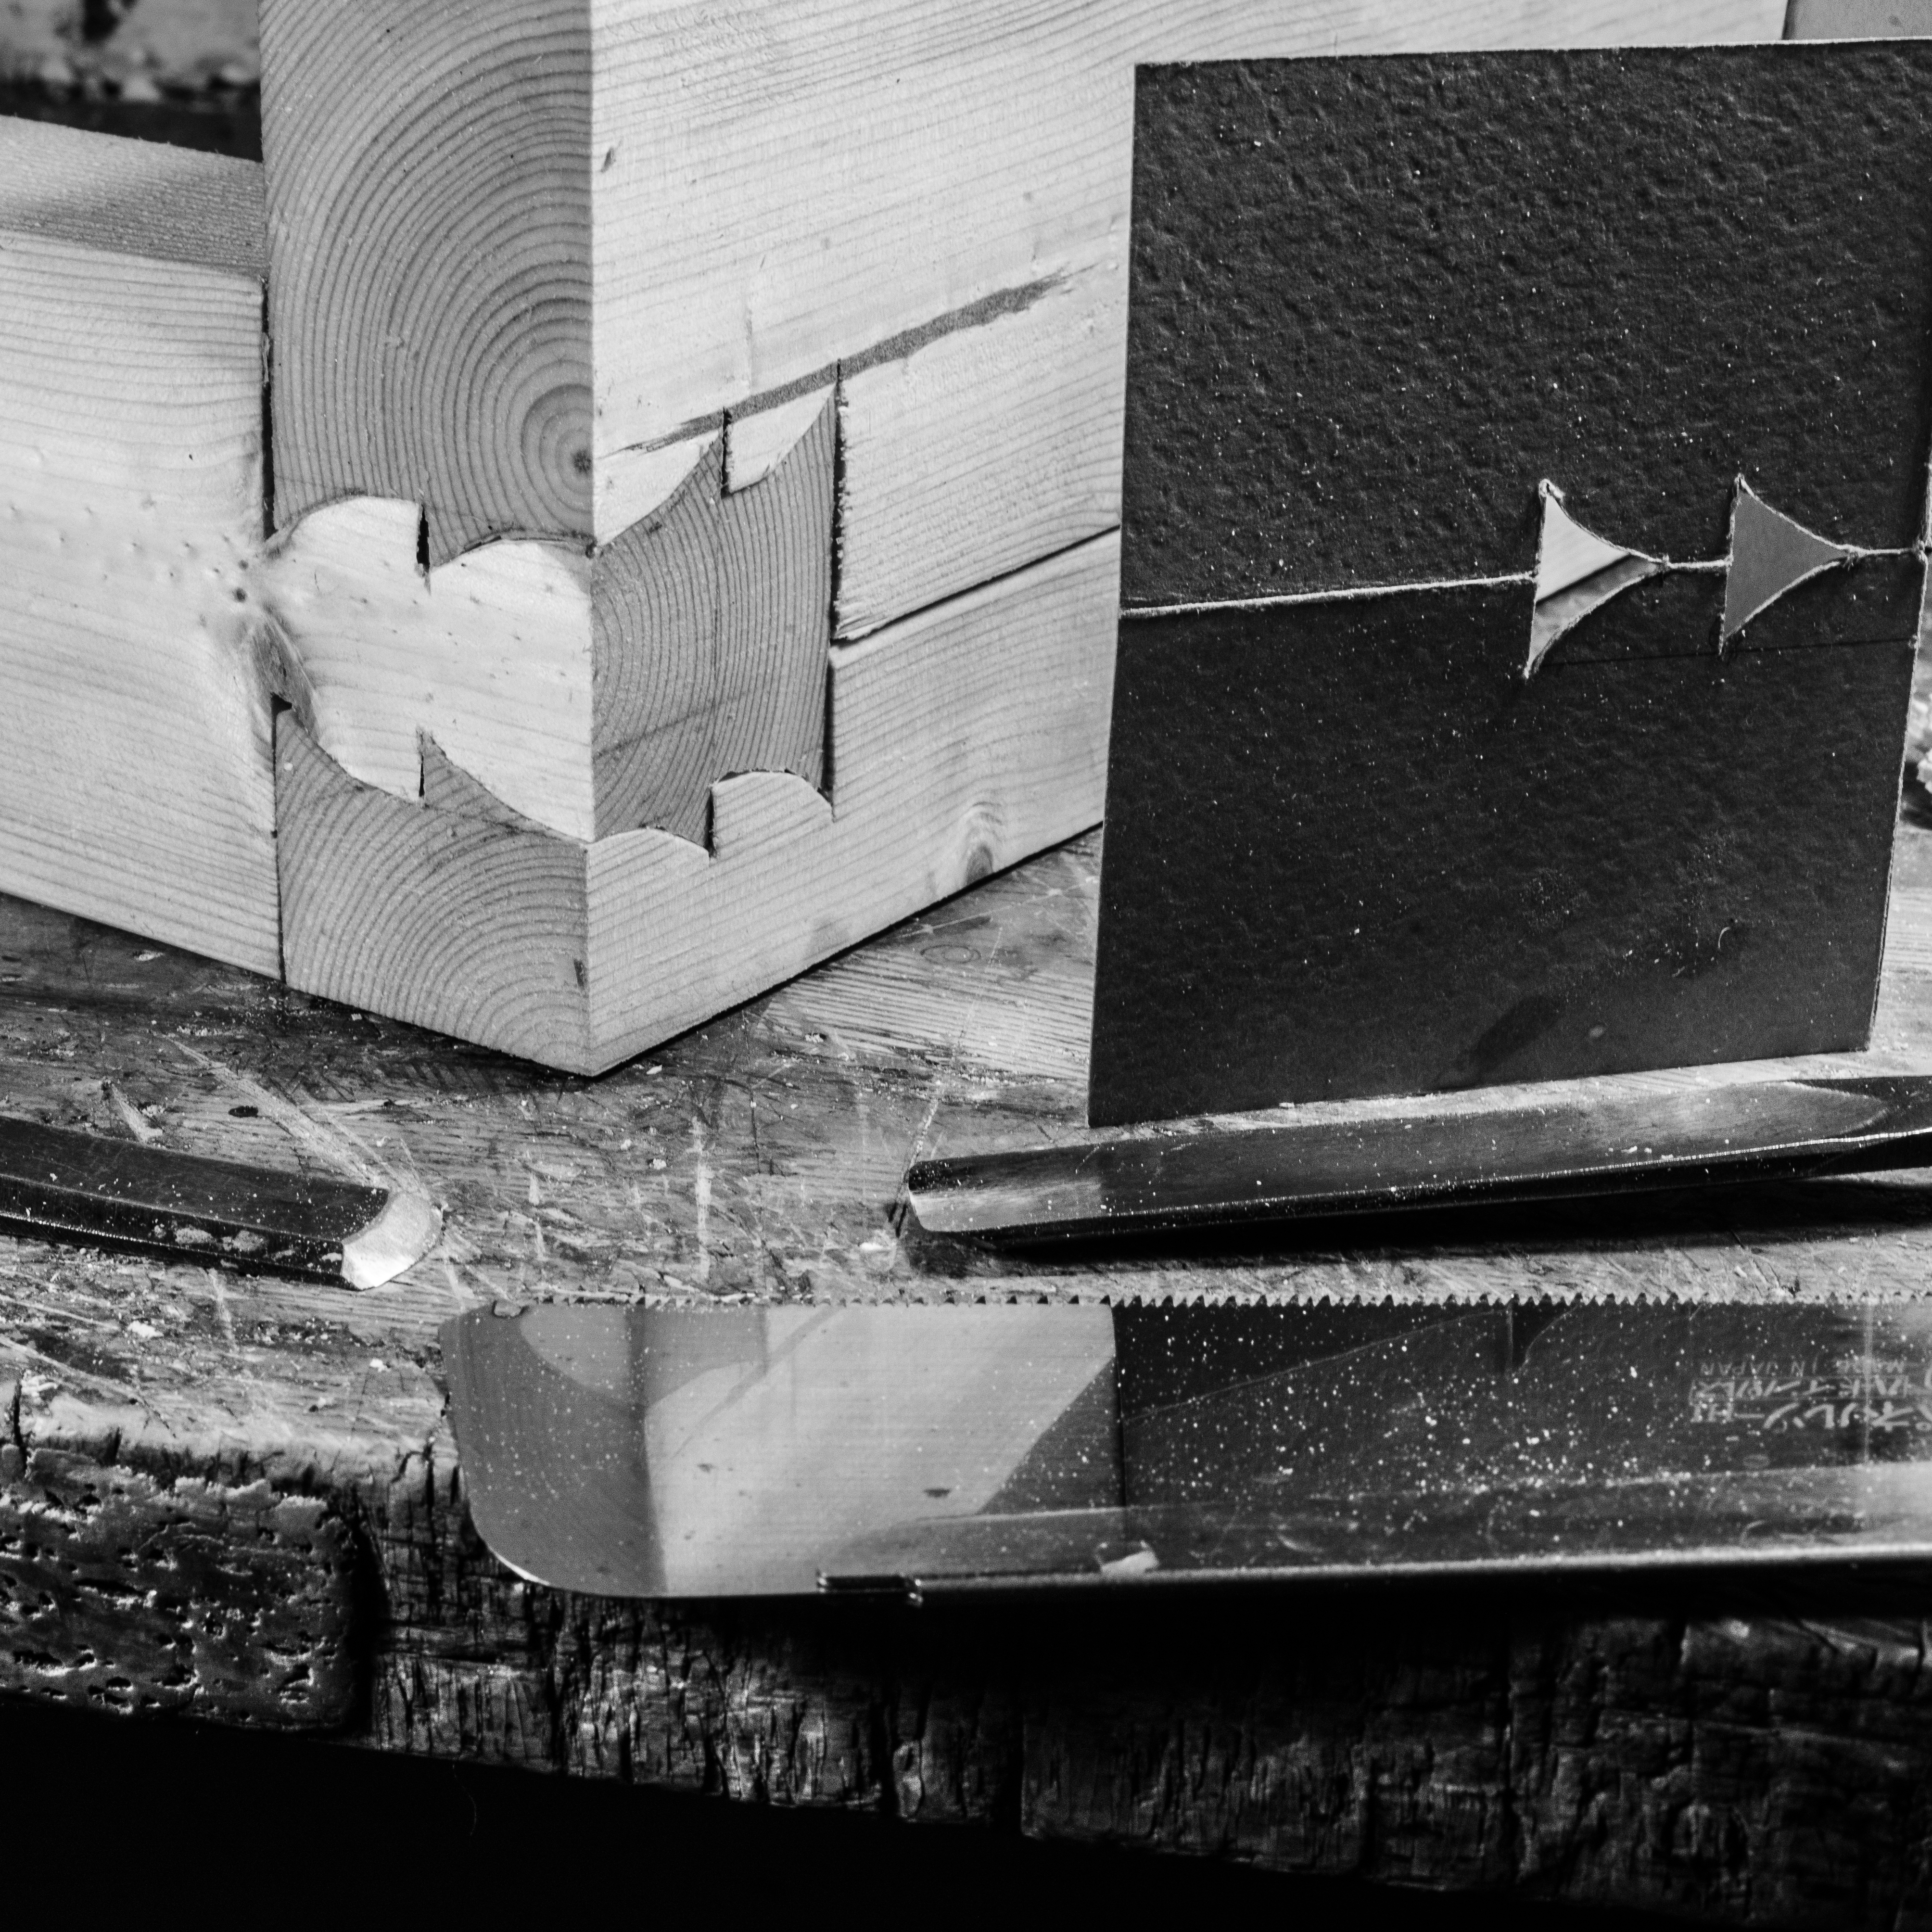
Once I found what a likely shape was, I realised something amazing (and obvious once one sees it clearly!) that the pieces are of only one type, with the under and upper faces of one given piece being mirror images of each other. Thus, for two pieces to fit together they need to be actually identical!
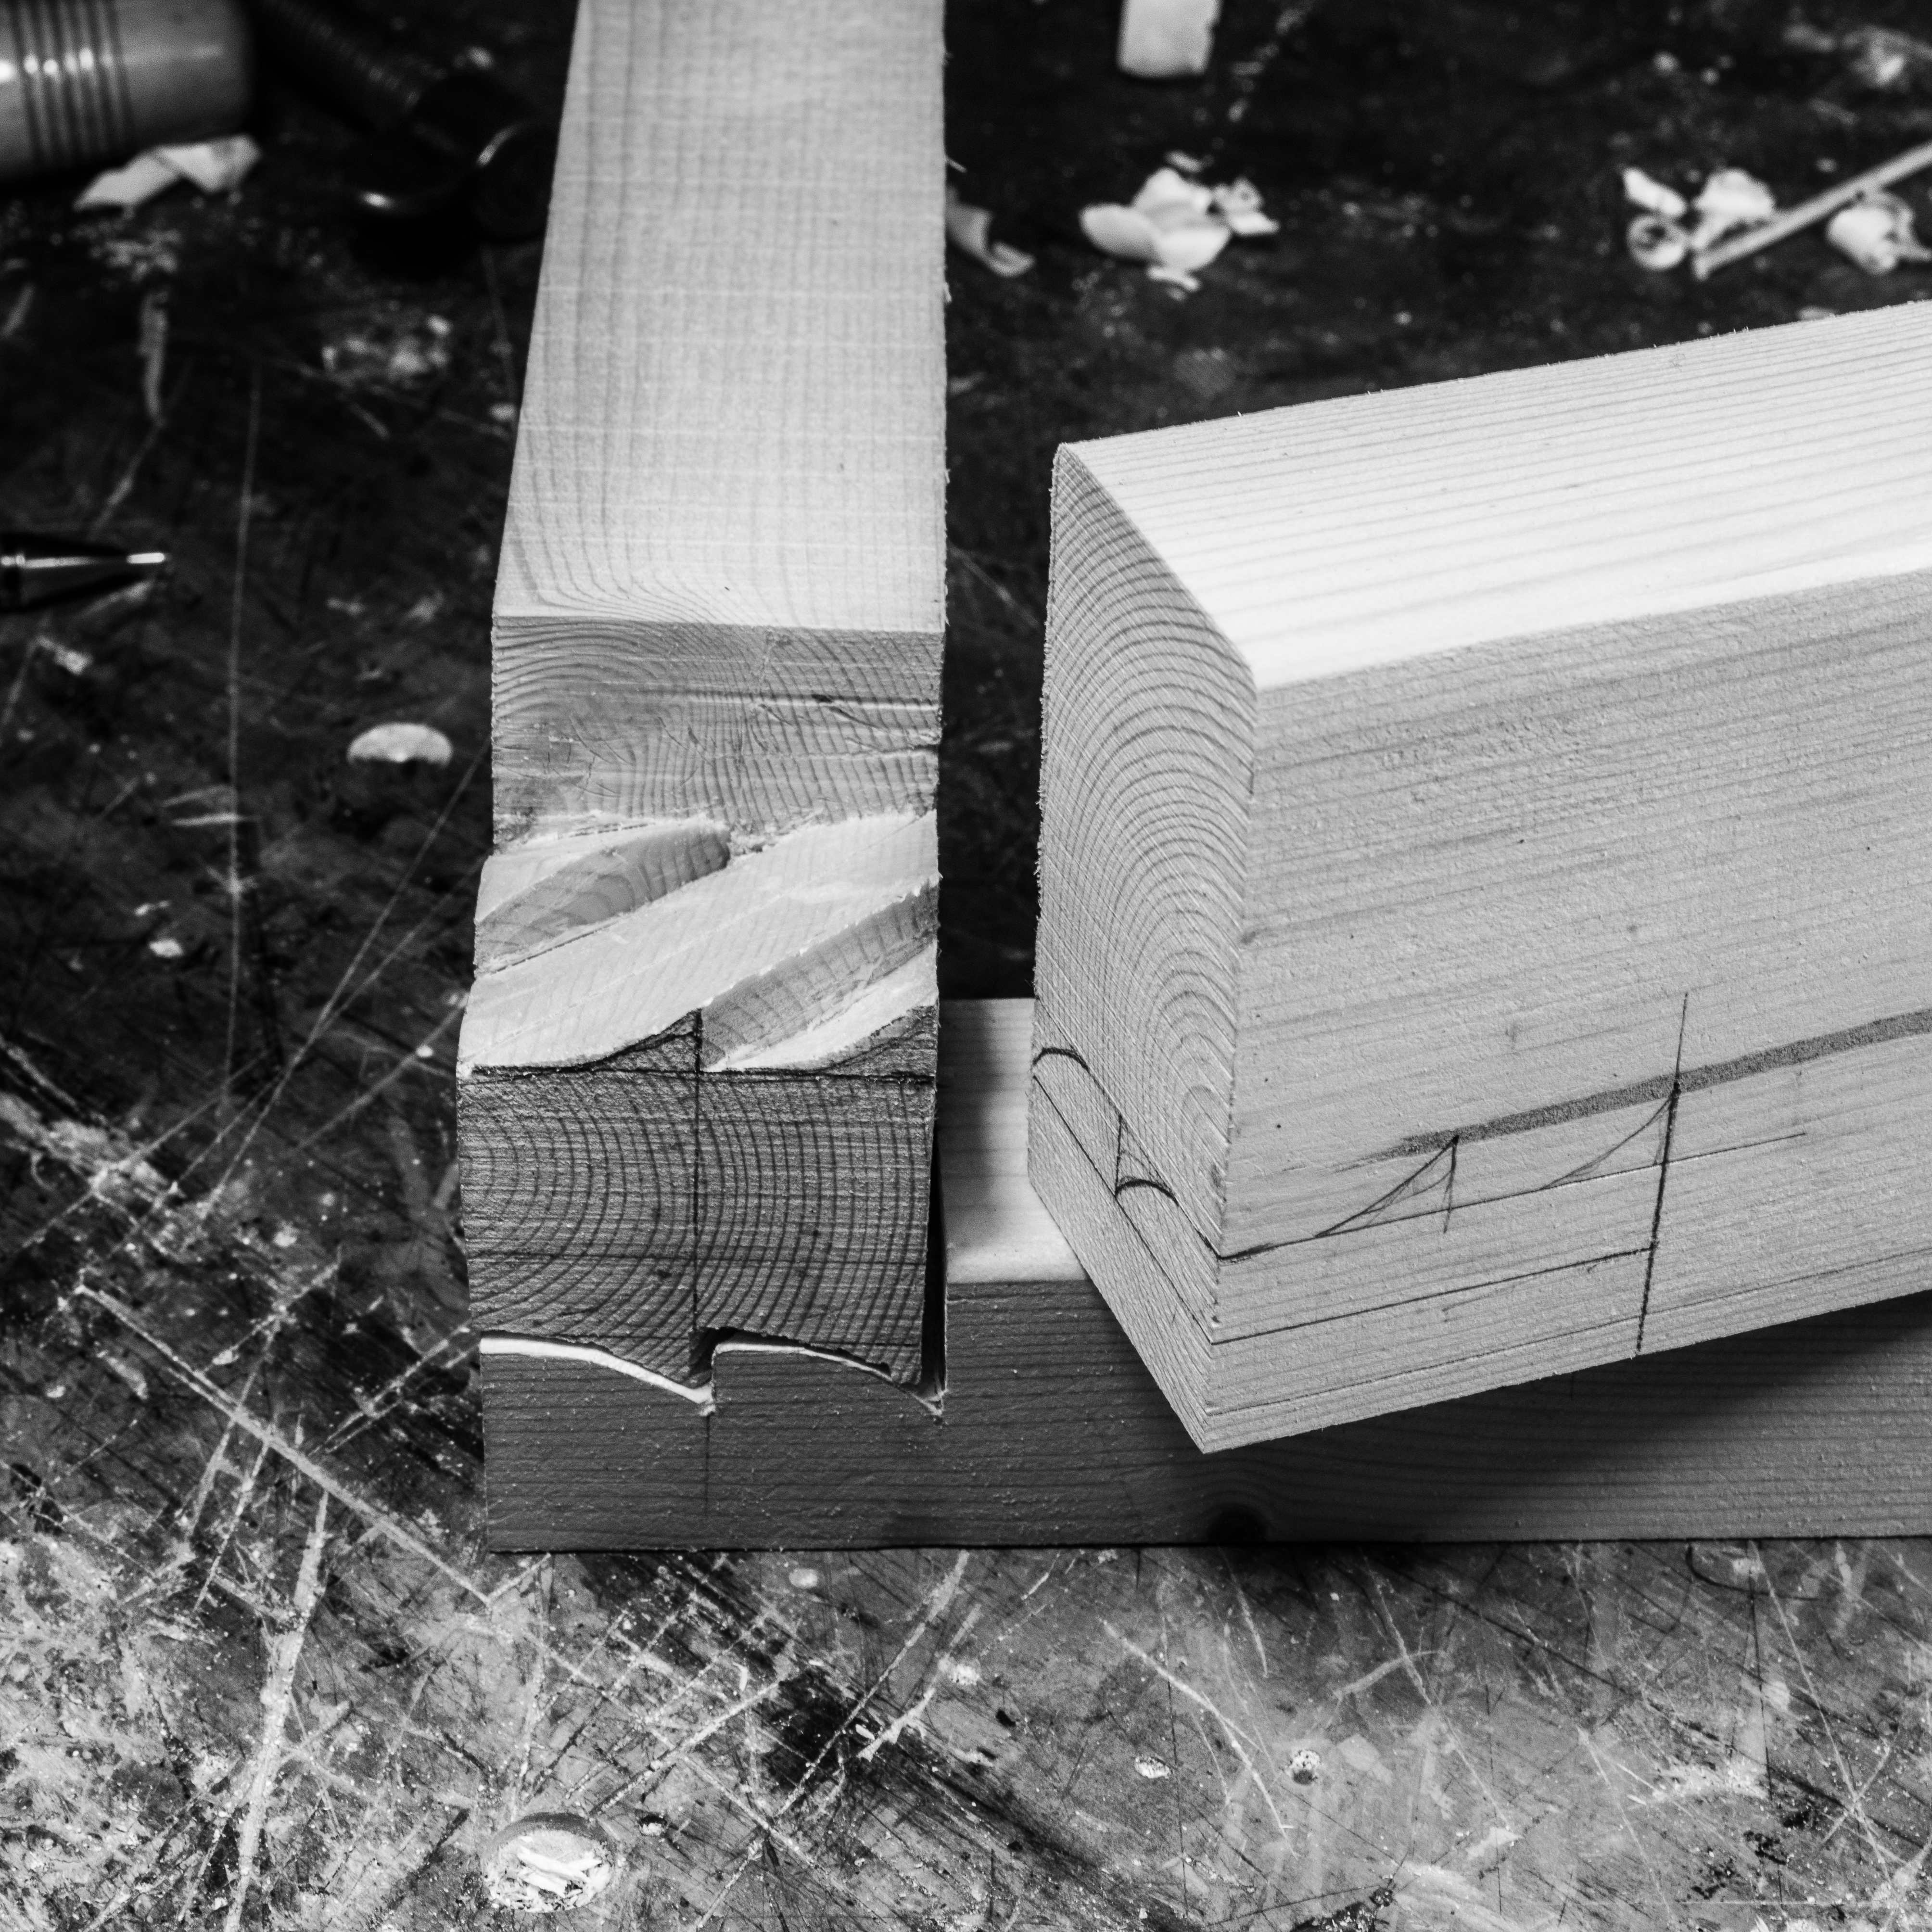
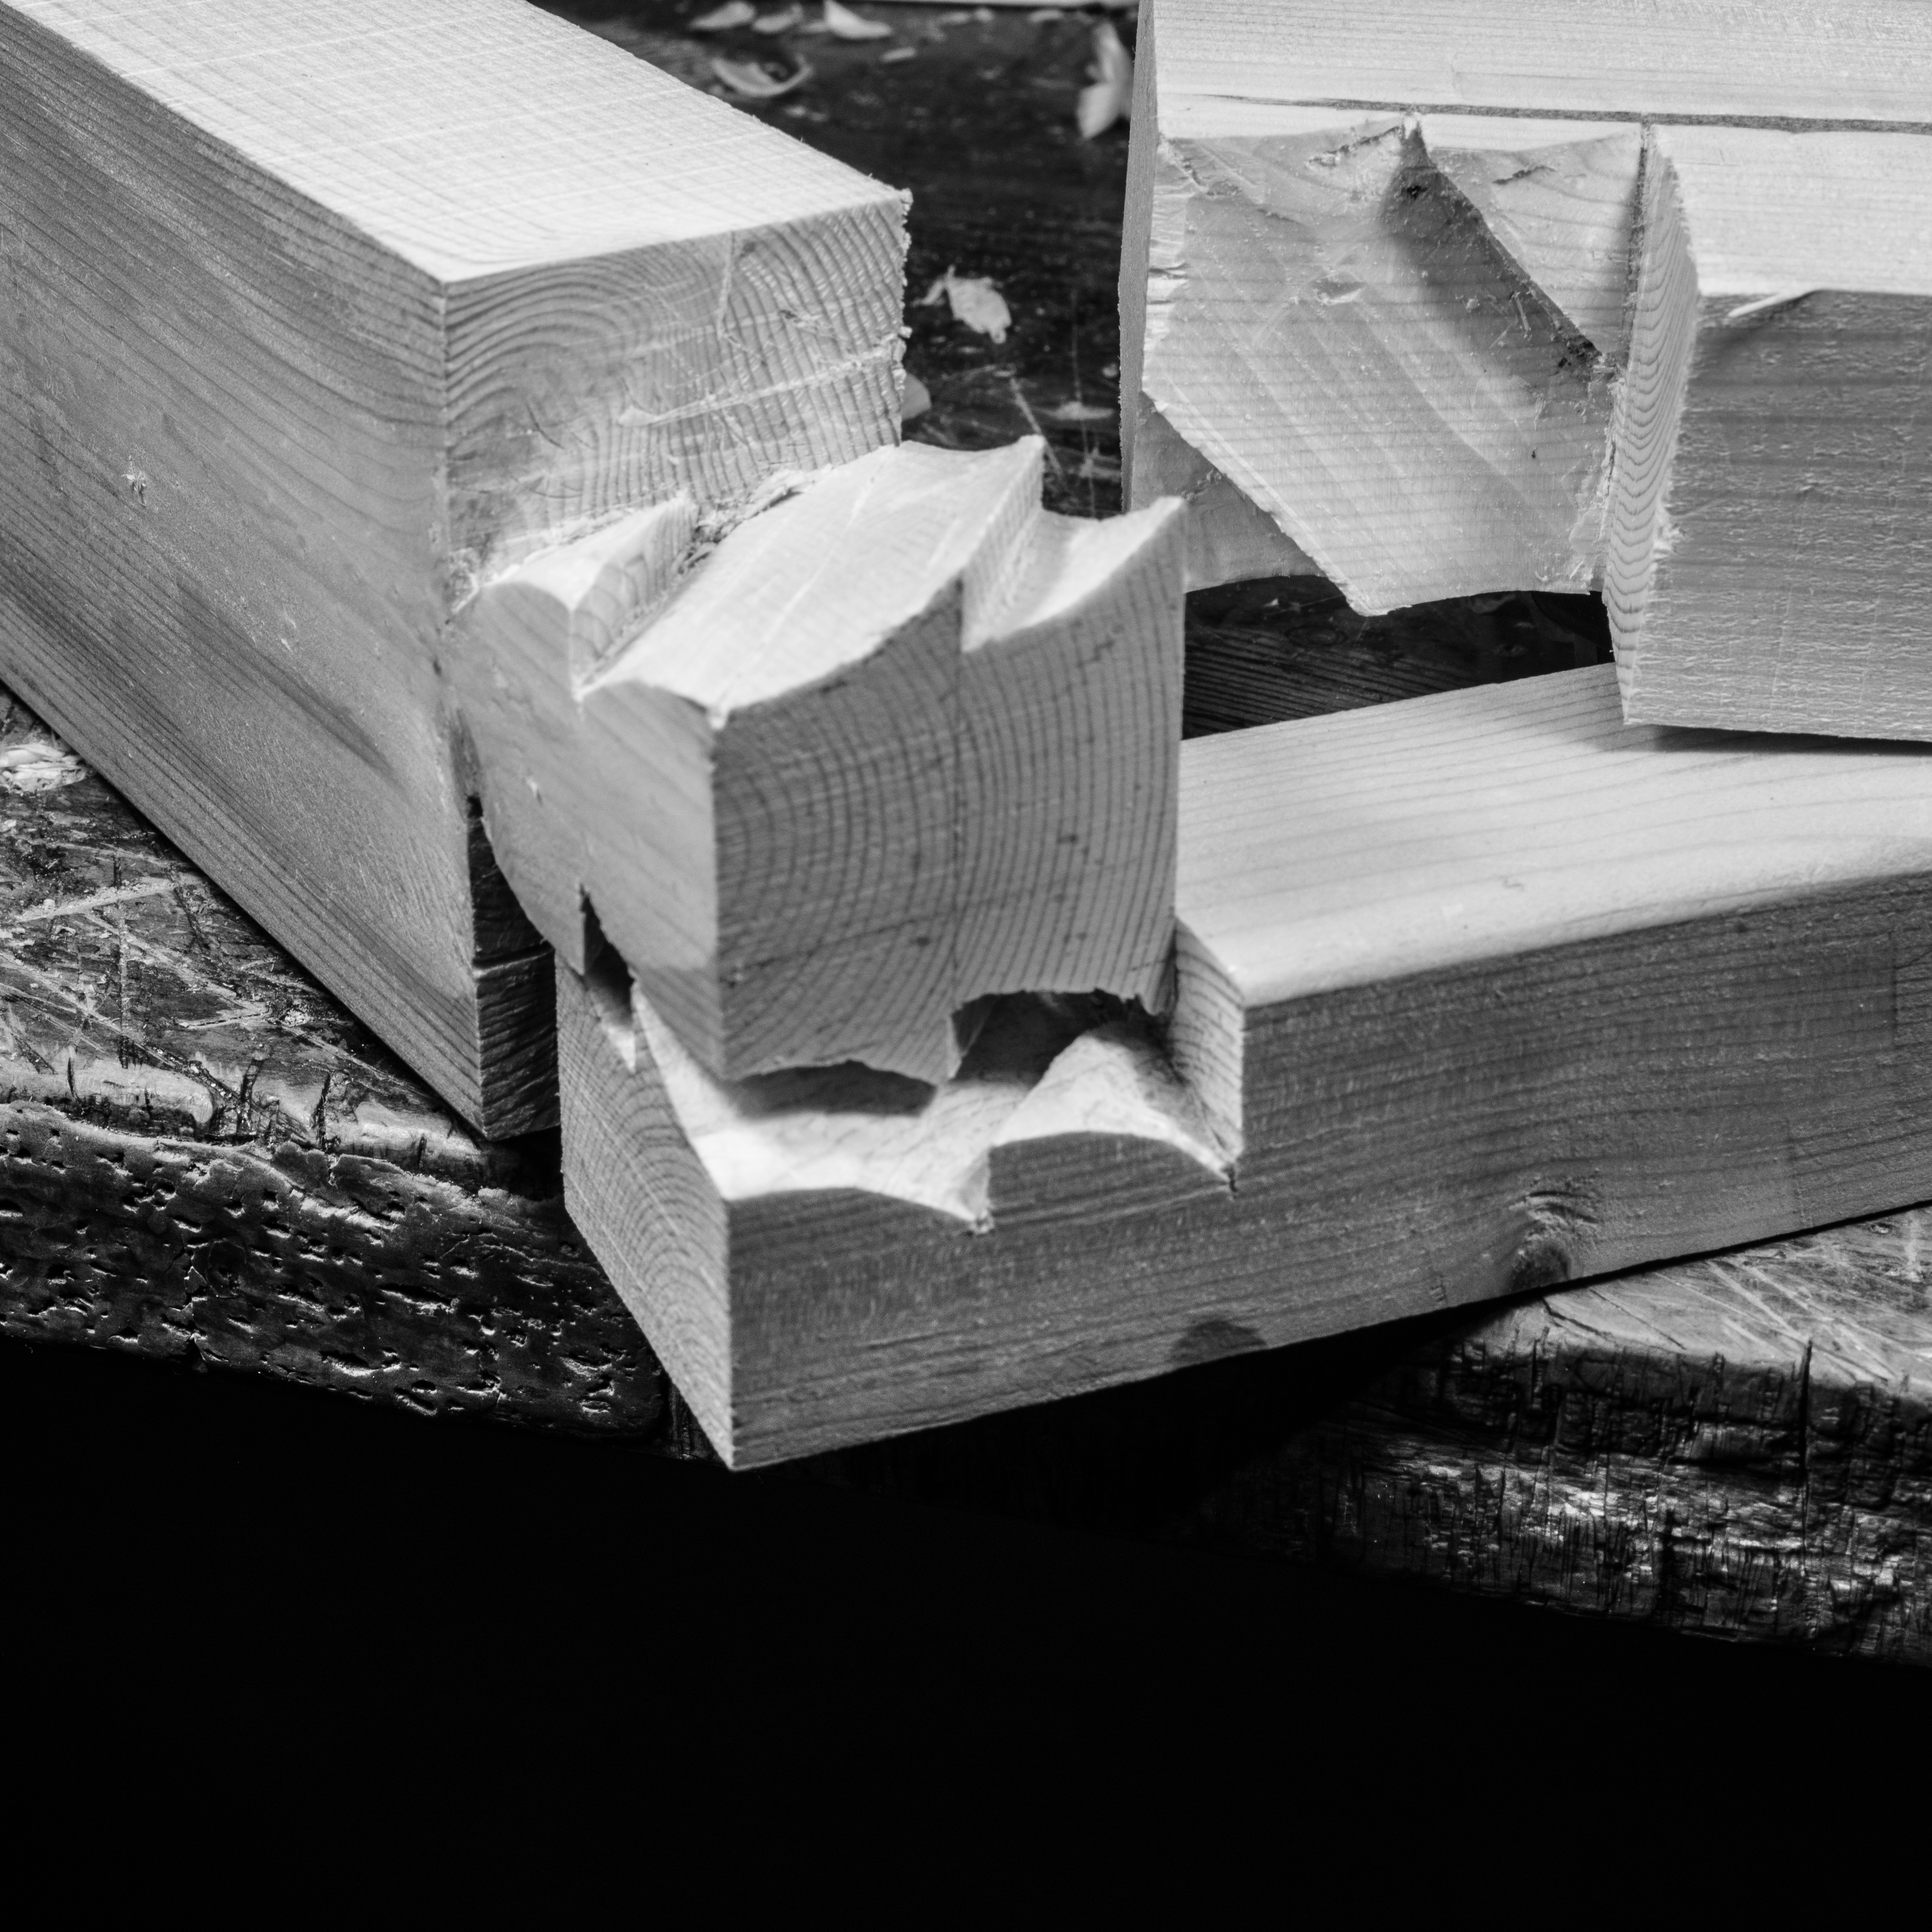
Cutting is one thing: I found that I got a little better at it after a few tries. A gouge, a chisel and a saw can do it, there is one area near the shoulder of the tenon which cannot be sawn, so it needs a bit of digging with a chisel, but otherwise it is doable.
That is cutting two surfaces and making them meet, on a small scale model.
Building the actual house, this would be taking place using pieces of wood which (I guess) are likely to weigh somewhere between 100kg and 200kg each, where the joints need to be fitted simultaneously on the four corners around the building. This is no mean feat, and would need to be underpinned by a rigorous marking strategy before any cutting is done, in order to minimise the need to move pieces.
I speculate that a single flat sheet of material (card, thin metal, thin wood perhaps, glue-sized paper?) could be used to mark all lines, designed in such a way that convex and concave are marked using the same drawing, therefore they have to fit. This is of course the general idea for marking dovetail joints.
This is the reason for the stencil cardboard template which I show (see photos).
Having tried to put pressures on the assembled wooden pieces I made, I was struck by two properties of this joint:
# when a vertical compression is applied to it, the angled joint becomes more resistant to bending and becomes more brace-like and apt at resisting shear and tension.
# if a load is applied which forces a distortion (bending) onto the 90 degree angle, there can be a bit of play to accommodate for it, and a small amount of movement can happen without breakage.
I think these two properties would be very useful in a timber building: one needs to imagine a roof made to resist the weight of snow, and the constant movements of wood which is an extremely hygroscopic material.
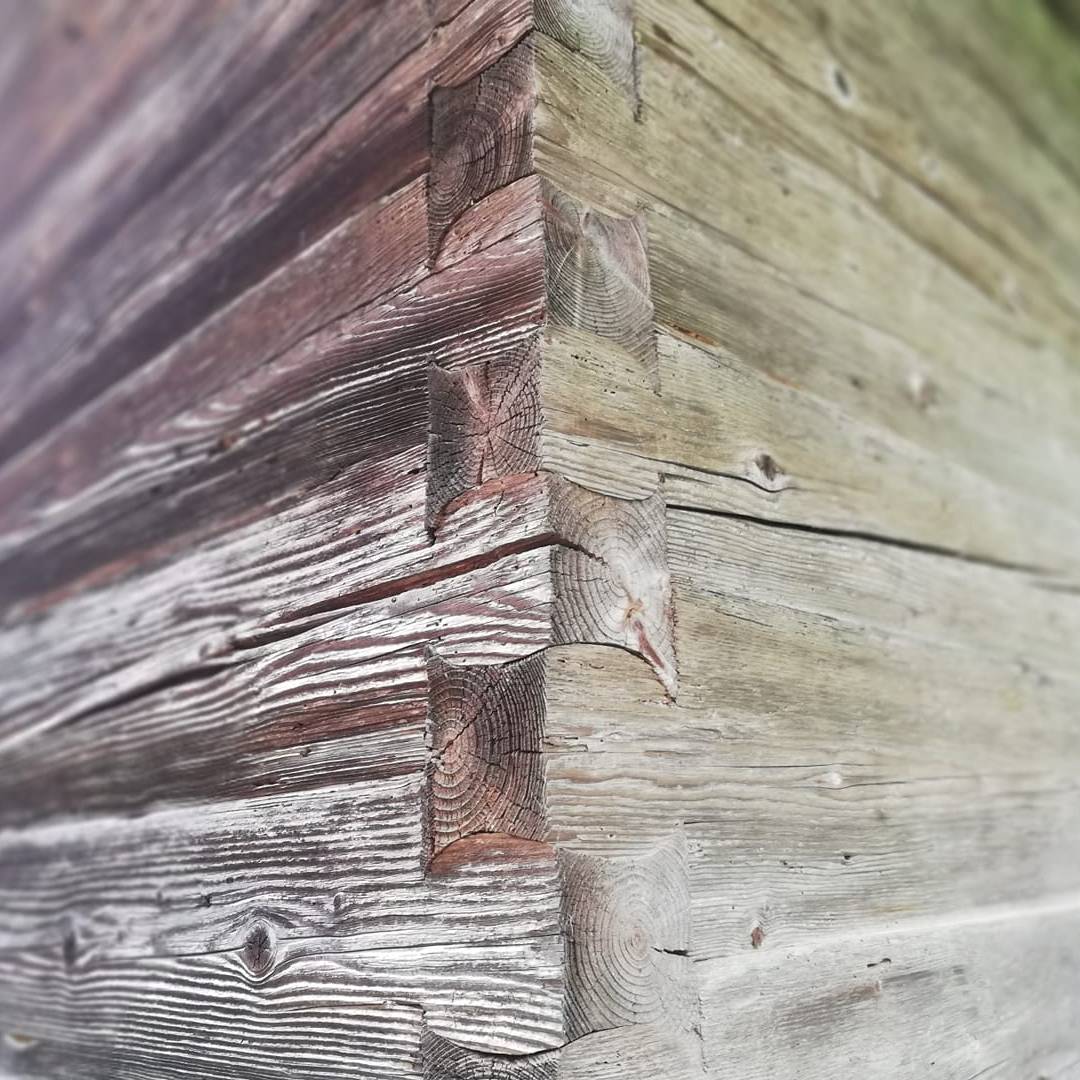
Miraculously some of these houses are structurally intact after 200 years or more.
—————————————————————————————————
Below: photos by Jože Kozjek of that house, and of another one from the same area with many shared characteristics


This short blog article is the beginning of what I hope is ‘work in progress’:
There is thought of a version in Slovenian, and also of an exploration more in depth of the context of these fascinating structures.
I wish to thank Jože Kozjek and Nina Katarina Štular.
Thanks to Paul Mackilligin for the stimulating conversations which lead to these investigations in wood!
[ © All rights reserved 2021 Bruno Guastalla + Jože Kozjek ]

Interesting subject Bruno, nice article …and very much hope you & your loved ones are all well!
Thanks Nick, good to hear from you!
Dumbstruck. The joints are an astonishing combination of ingenious, complex, and beautiful. And I love the photos of your workings out, and so impressed by the work you put in. What a challenge – and what a well met challenge . I think you may have hit on an ideal way to fend off the lockdown blues! Brilliant.
Hi Keith! Yes this is fun, and it keeps giving: Jože is in the process of gathering more pictures, and info on context and more . Thanks, B.
Thanks for this Bruno – I look forward to the extra photos and detail. Just so remarkable to see how a combination of necessity and simple forward planning drew out such a high level of sophistication.
This is a fascinating subject. I’m a log home designer and builder for 40+ years in Oregon, USA. These notches shrink tighter as they age it appears. Notice your model has a slight “underhang” of the ends of the members but the photo of the old timbers shows a slight overhang, yet the notch is very tight towards the interior of the sturcture. Of course logs weigh a lot and consderation of putting slightly more pressure on the joint as apposed to the length of the log is important too. Great research! Please continue.
Good to hear from you Greg!
Thanks for your contribution!
I think my model suffers from ‘beginner’s approximative cuts syndrome’ ! (although as a maker of violins I sould have known better, I was a bit timid in my relation to the scribed lines..).
To try to add to your points about overhang on the joint itself: 1/ The joints are such that a vertical load tightens them up (which is a smart move design wise!). 2/ Shrinkage over time: as a rule longitudinal shrinkage is negligeable if compared to tangential and radial shrinkage. Therefore, I would tend to believe that the overhang one sees of the long grain on the photograph of the house is simply due to this.
So I have a suspicion that what they did was pretty exact with good fits everywhere, and that what we see now is a construction which has aged well over 200 years +. And, thinking of it, I expect you are completely right that the corners were likely to have been given a tighter fit initially than the length of the logs, so that, with the massive compression of the weight of the house, roof and all, the joints indeed tighten and the whole structure coalesces.
I’m sure you’re on the right track, Bruno. And work like this is not a “one off”. It is an evolution of thinking and building over lifetimes. Whether they used templetes or had ‘templetes of the mind’ (vast experience) is hard to know but one thing is sure….these are masterpieces. I hope Joze is doing exhaustive research on this style of construction where ever it is found and we can look forward to the who, when, how and why of these acncient styles of wood working. This is a b ig deal.
Great, Greg, I very much apppreciate your encouragement, and will let you know personally when more comes out. I think you are right about templates too: it is a question of what to mark and where; it could simply be done with dividers and three notches on a set square (to mark the three cutting levels on each surface top, mid, bottom), and the ‘filling in’ done by eye and feel. One thing is for sure: there is no room for error in this. In the violin making world which I have inhabited for 45 years, there are surpringly few aspects of working as naked as this, (except purfling inlays). Shapes are arrived at ‘from above’as it were, so even if one is always using the biggest tool possible at all times, one has time to see the shape emerging and the opportunity to make adjustments.
The Japanese also do this. The are YouTube videos of them creating very complicated joints.
Dear Magda, Thank you for your comment. Japanese joinery is indeed amazing, extremely varied and rightly well known. It would be great if you could find videos of Japanese joinery where the type of joints and processes somehow relate to this particular way of doing things. Please do post them here!
The photo that showed up on my FB feed is amazing. Truly amazing joinery, and at a level of complexity I have never seen in a log building. It is not only beautiful. but obviously superior to any other log construction joinery. Would love to know about the person that developed it. Thanks for sharing this gem.
Bruno thank you 🙏 so much for sharing this study. Was wonderful to see in on the FB feed today as Jim did. Enriching and inspiring work and so important to see that this is authentic and historic, lasting work.
I am glad to have seen this today.
Bruno, I first saw an image of this joinery two years ago and have been in search of a craftsperson local to the region it comes from. I’m able and willing to travel for the experience of learning it. If you or anyone else on this thread have more information on learning itt on location I would appreciate the information.
Dear Phil, I think the best way would be to get in touch with Joze (see above) I haven’t been in touch with him recently.. Do contact me either with the contact link on this blog or via messenger, and I’ll see what I can do. I haven’t been there myself. It is that region:
https://www.google.com/maps/place/Tuhinjska+dolina/@46.2182639,14.75146,13.54z/data=!4m6!3m5!1s0x476548836299d5a5:0xeb795aa3d4588d8c!8m2!3d46.2230123!4d14.765082!16s%2Fm%2F05226lz!5m1!1e4?entry=ttu
I don’t believe that this is a tradition which has carried on and is still alive. These are old buildings. If you are in a position to help revive that tradition, good on you! See post above.
Phil, although I can’t join you as I’m on the other side of the world, I too am very interested in this “discovery”. I may be able to stir up some interest in several wood working institutions and perhaps some funding?
(apologies for the delay in approving comments.. I thought I had already done it.. By the way, I’ll make the trip gladly if there is mileage in this idea…)
Hi Bruno, can you please add your research to our map-based historical platform? https://metaport.ai Thank you
No doubt…very beautiful & functional…scribing the top to the lower pre cut notch.
One would think you would have to do the other end as well. Try to keep level as you move upward.I don’t think you could get those notches perfect the first time ? Might have to scribe multiple times as well?? Not taking any thing away from the wizardary here
But doing this with hand hewn 18c oak would be quite the challenge. I am game!
This way of notching is a game changer.
So does this style have a name? Is it “Baroque variation on a double dovetail”?
I called it that, simply out of not knowing what to call it…!!
These are fantastic! I saw a photo just ten minutes ago, fortunately with a link, and speed read your article. I think the key is to look at the INSIDE of the house, or a dismantled joint. Without pictures of the inside joint you make s lot if assumptions. If i were doing this? Think outside the box of your modern tools. Think DOUBLE BLADED FRETSAW with adjustable fret distance. Lay the two beams on top of each other, saw your joint, mirroring top and bottom at the same time. Job done. Occam’s razor
Dear Mr Edge Sharp, I think you are right that one needs to be wary of one’s assumptions. So thank you for your comment, and interest! I’d like to understand better how you would do this practically with a saw. Your idea sounds really good, but -my failing here- I can’t quite visualise it. Do contact me via the blog, and if you would like your ideas to be put in as addenda to my initial article, I would be happy to have them here with drawings/ sketches/ photos etc.. you might provide. Let me know! All good wishes, Bruno
Indeed! I would like to see some photos/drawings as well. I’ve pushed this link out for many years.
It strikes that, among the benefits of this joint is that there are no flat surfaces for water to accumulate on, and that they all drain down to the narrow grooves which provide a pathway out of the joint for any water that gets in.
I believe you are correct. The valleys (narrow groves) incline to the outside of the structure while the slight undercut allows for some shrinkage to tighten the entire joint over time. Great observation! Now will someone work up a comprehensive method to create this joint in a timely manner? (And a great machinist to make a great set of scribes!)